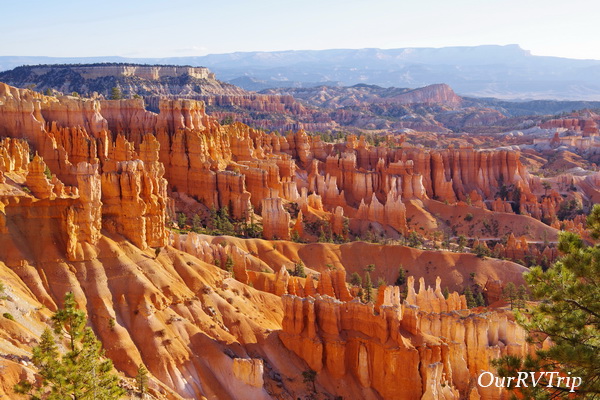
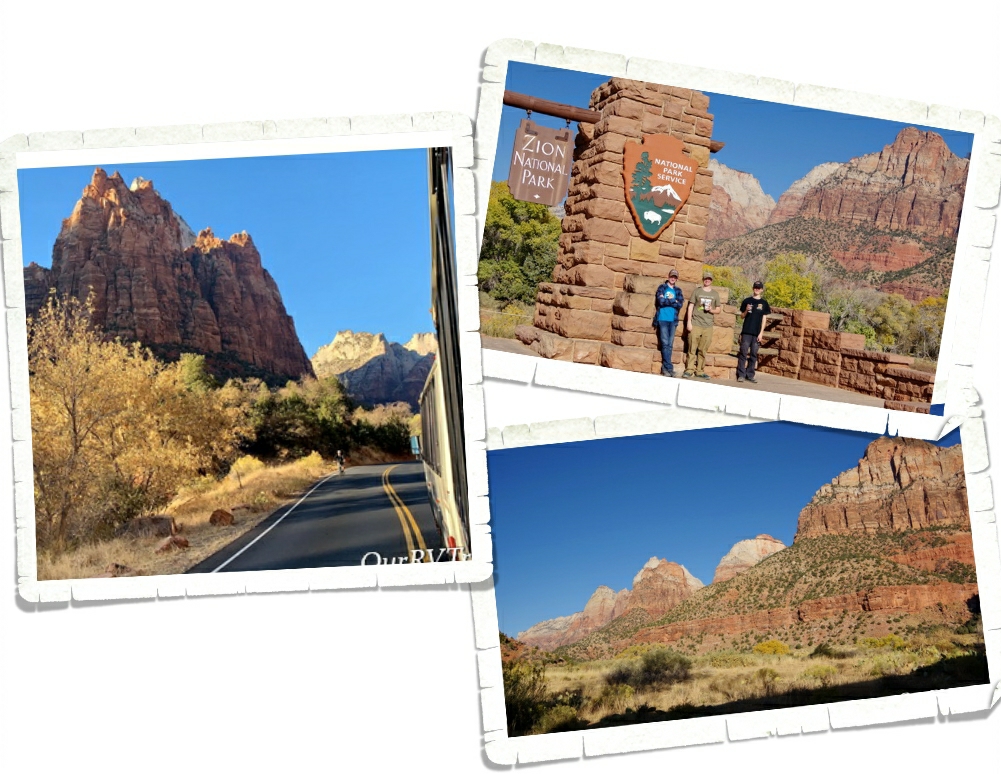
Category: Hiking

Zion National Park

Zion National Park

Hey Guys!! We’ve made it to the last post of the Southern Utah section of our National Park Tour and our focus is on Zion National Park!

This canyon was called Mukuntuweap by the areas first inhabitants and changed to Zion when it became a National Park in 1919. It’s not the biggest National Park in the country, but it’s definitely one of the most popular. Zion National Park has six sections. Yup, you read that right. Six. We didn’t make it to all six sections, but we made it to four and saw the beginning of a different section (the narrows), but didn’t actually explore it.

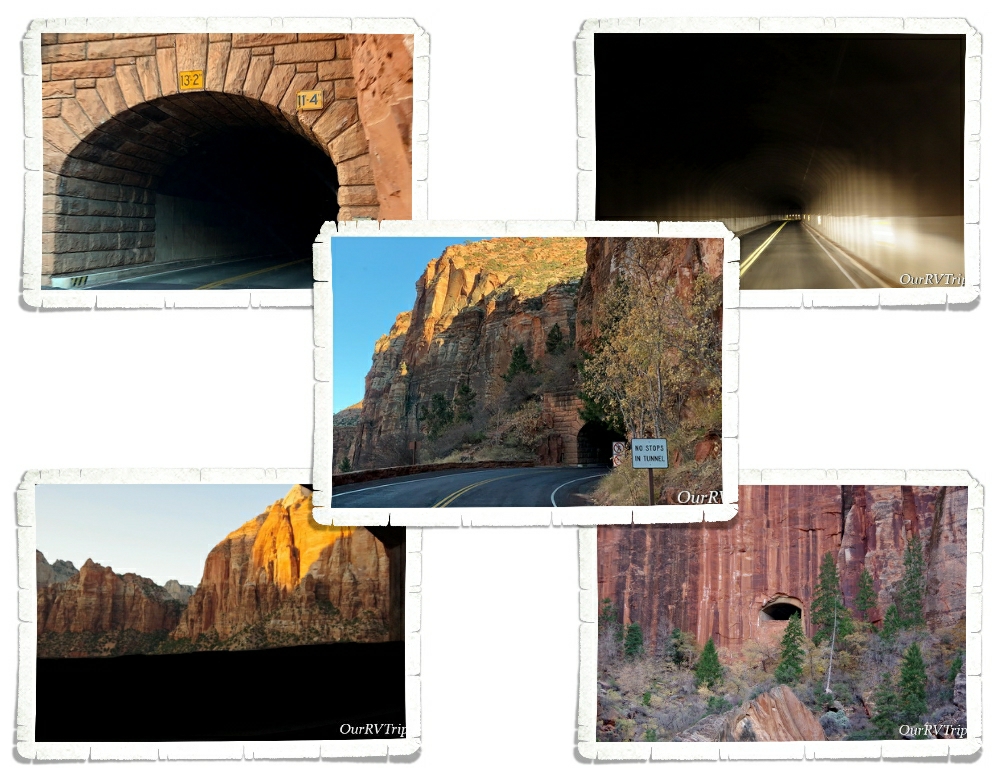
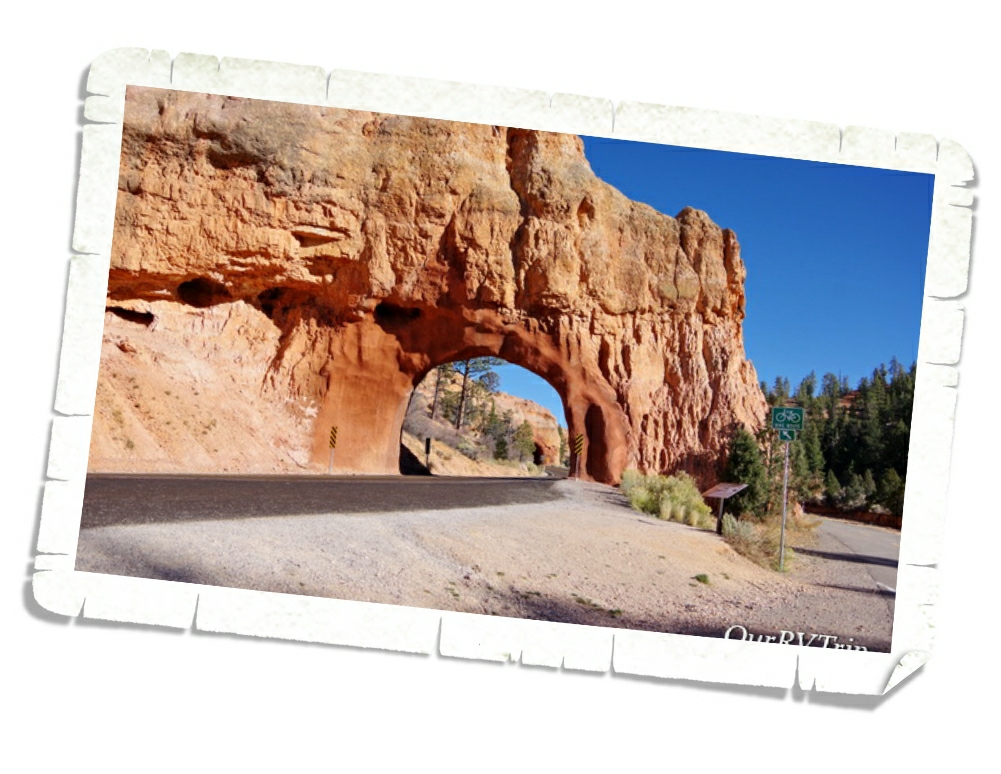
Let’s start with the Zion-Mt Carmel Tunnel. Oh, the things I’ve heard about this tunnel. When I first decided to do a tour through Utah’s Big Five, I knew we would end with Zion which meant we would either have to go through this tunnel or find a way around it. The tunnel itself is just over a mile long and is 13’2″ tall in the center. So, if you’re in a vehicle over 11’4″…well, you’ll need to drive down the middle of this two way tunnel to make it through. Which, means you have to pay $15 and have an escort. I didn’t want to even think about that tunnel and our home-on-wheels so we went around. We did go back and drive through the tunnel in our 4Runner and decided we’d made the right decision.

The tunnel itself it pretty cool! Construction started on it in 1927 and completed in 1930 with a cost of $503,000…to put that into perspective…that would be around eight million dollars today (2019).

In the tunnel, there are big windows (galleries) that allow some natural light in. I got a picture out one of the windows…it was tricky since you can’t slow down or stop within the tunnel. Originally, the windows were used to get rid of the rock the tunnel was made of. The rock from the tunnel construction was dumped out of the windows into the canyon below.

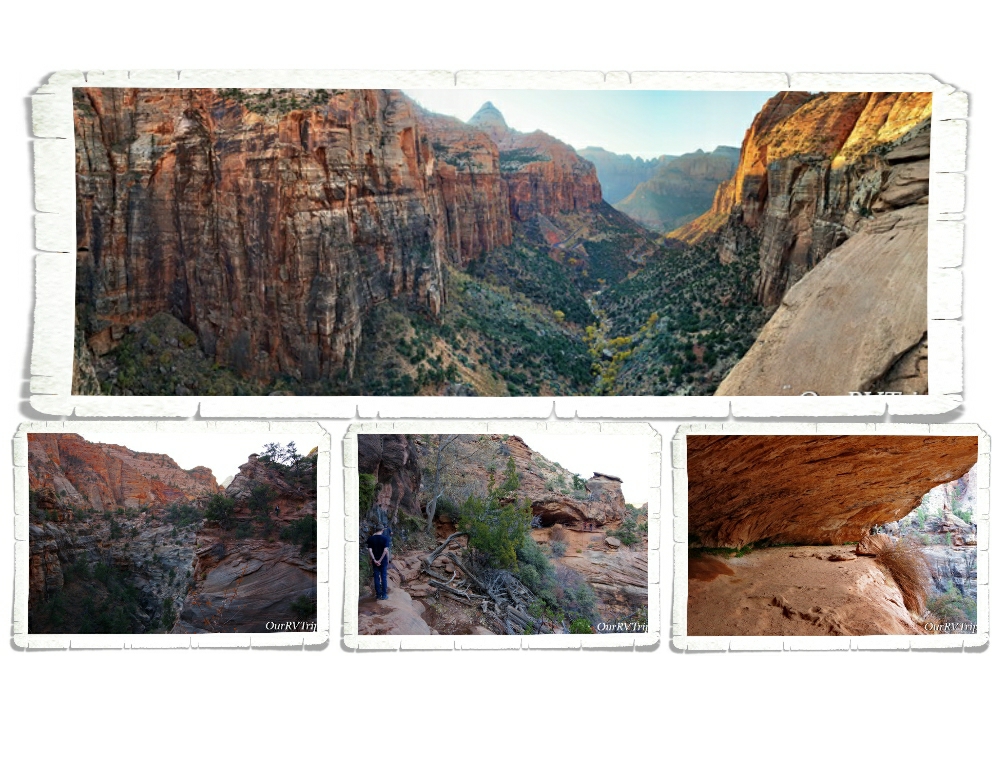
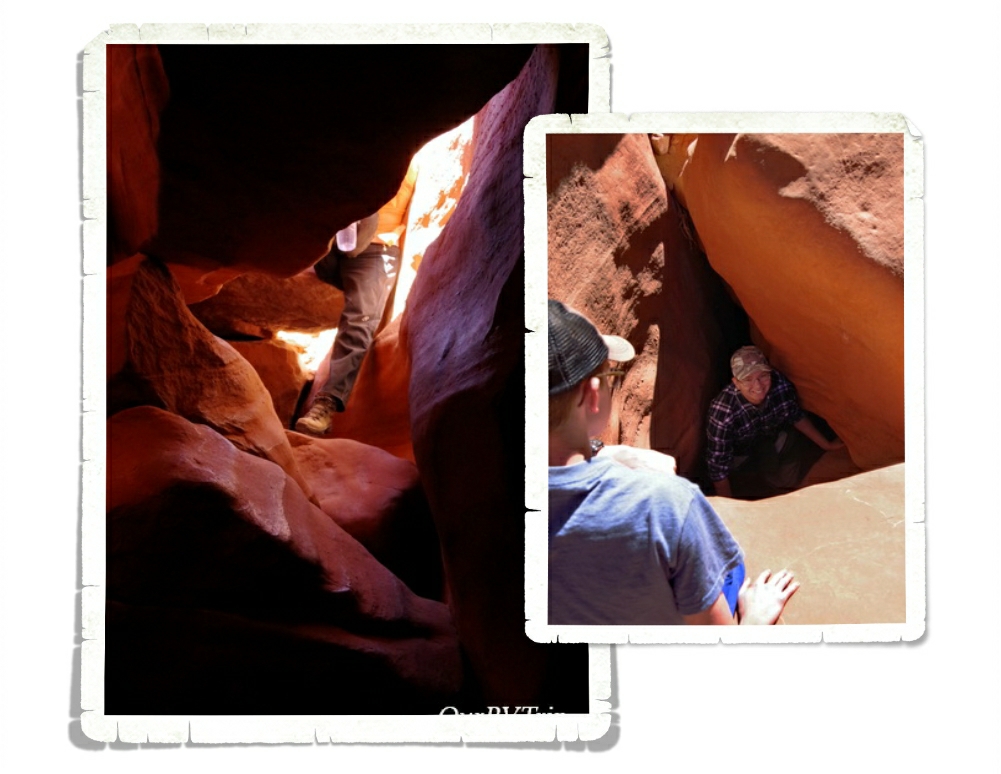
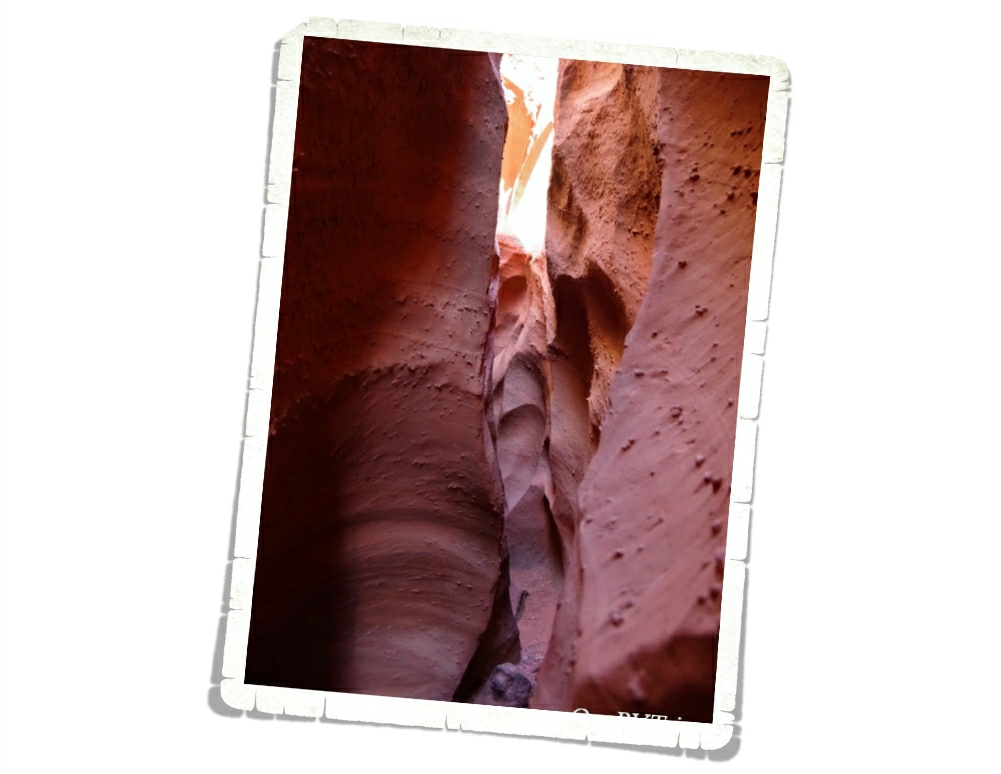
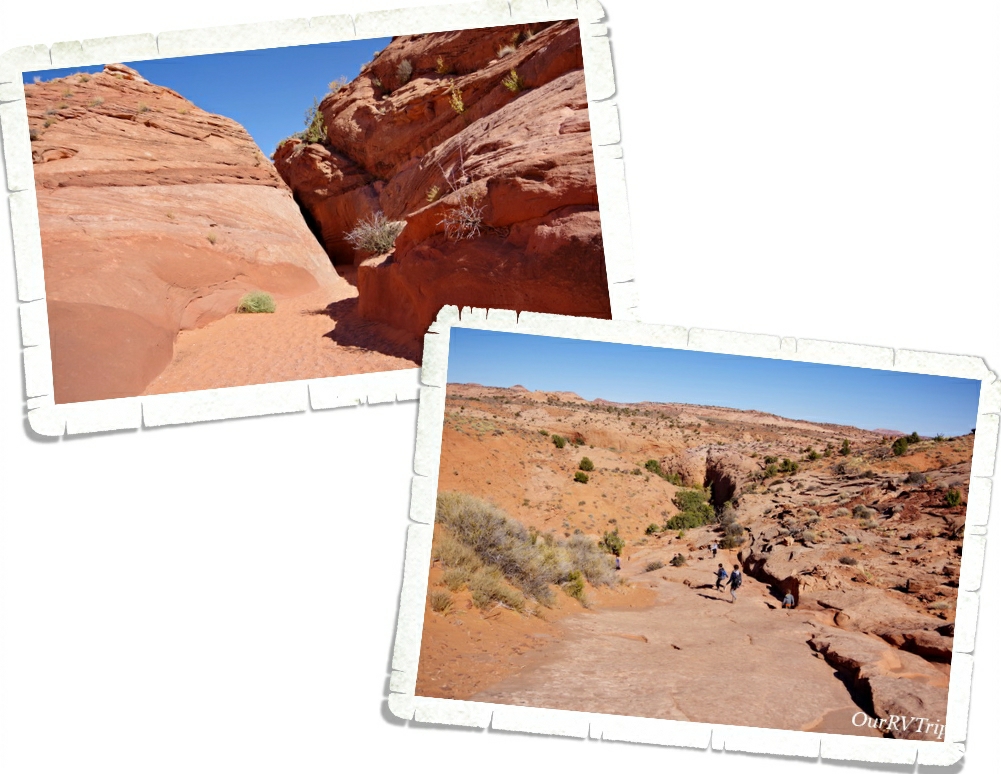
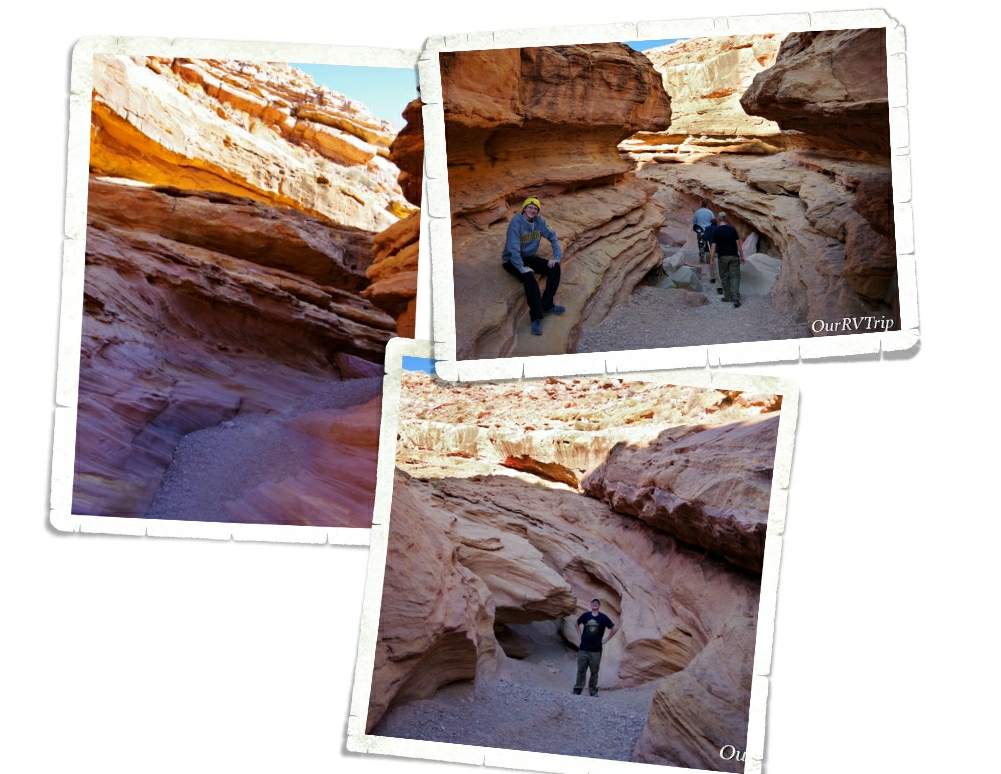
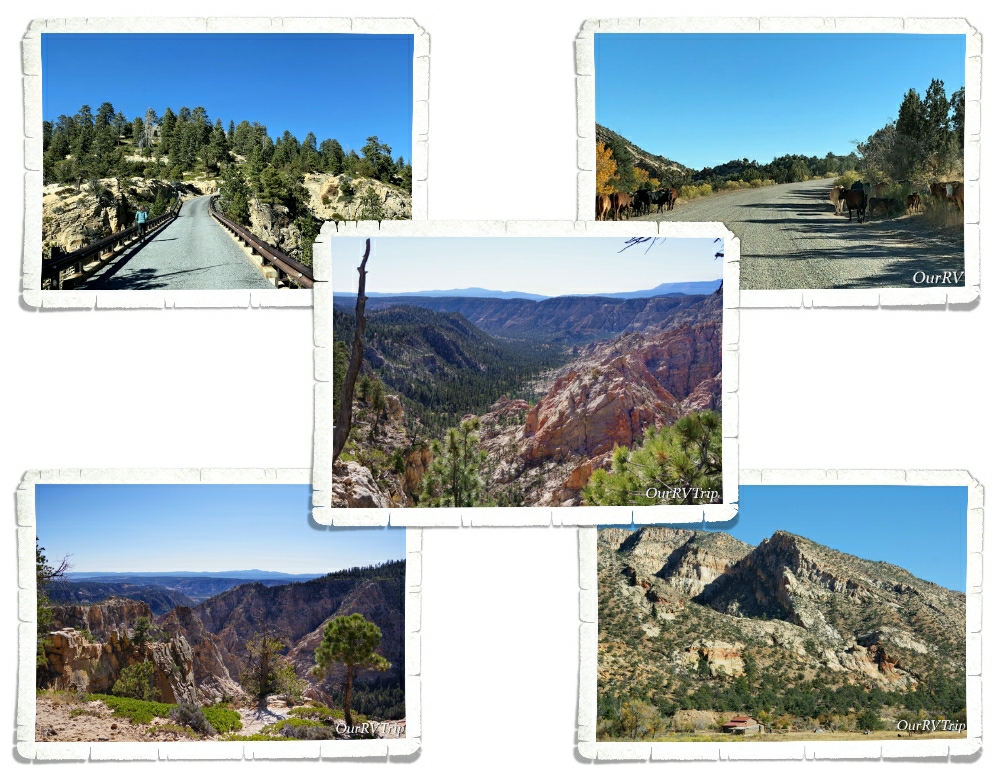
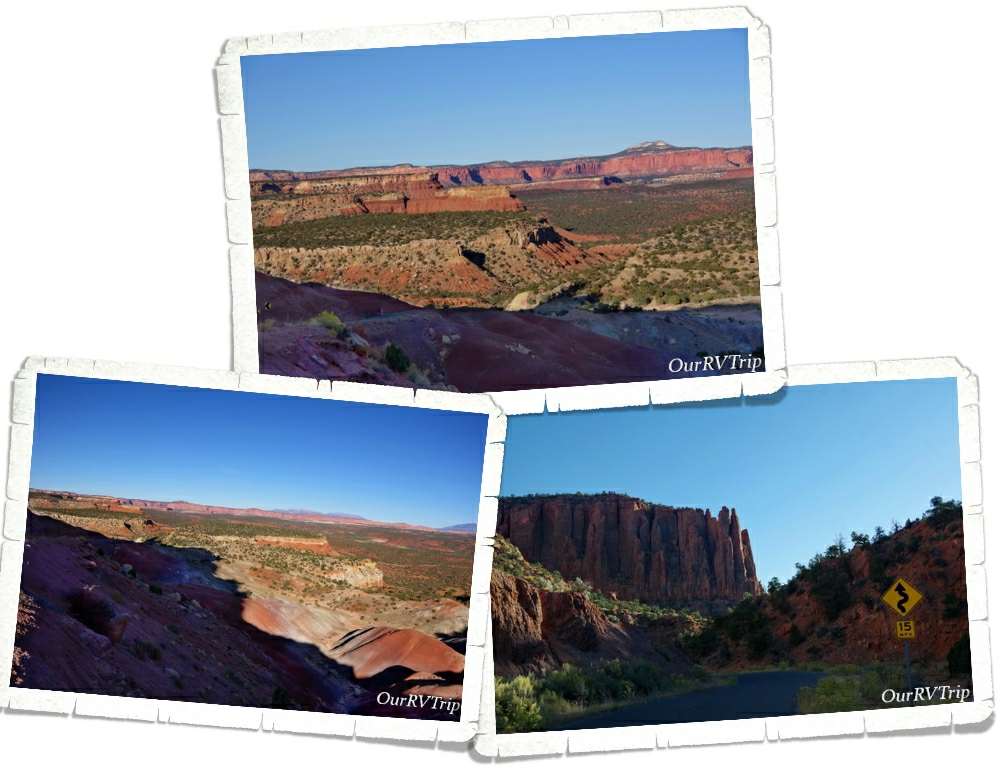
The first section of Zion that we explored was the Upper East Canyon. We went through the tunnel so we could do the Canyon Overlook Trail. We picked the wrong time of the day to do this trail. Pretty much all of it was in the shadows which made getting a good picture of anything difficult. The hike was really cool though! We hiked up onto the side of a canyon, through a little cave, across a weeping wall, and out to the overlook. If you do this hike, make sure you’re wearing shoes with good grip. There’s a lot of walking on slick rock that is sometimes wet. We saw a few people doing this hike with the wrong shoes and they struggled quite a bit.

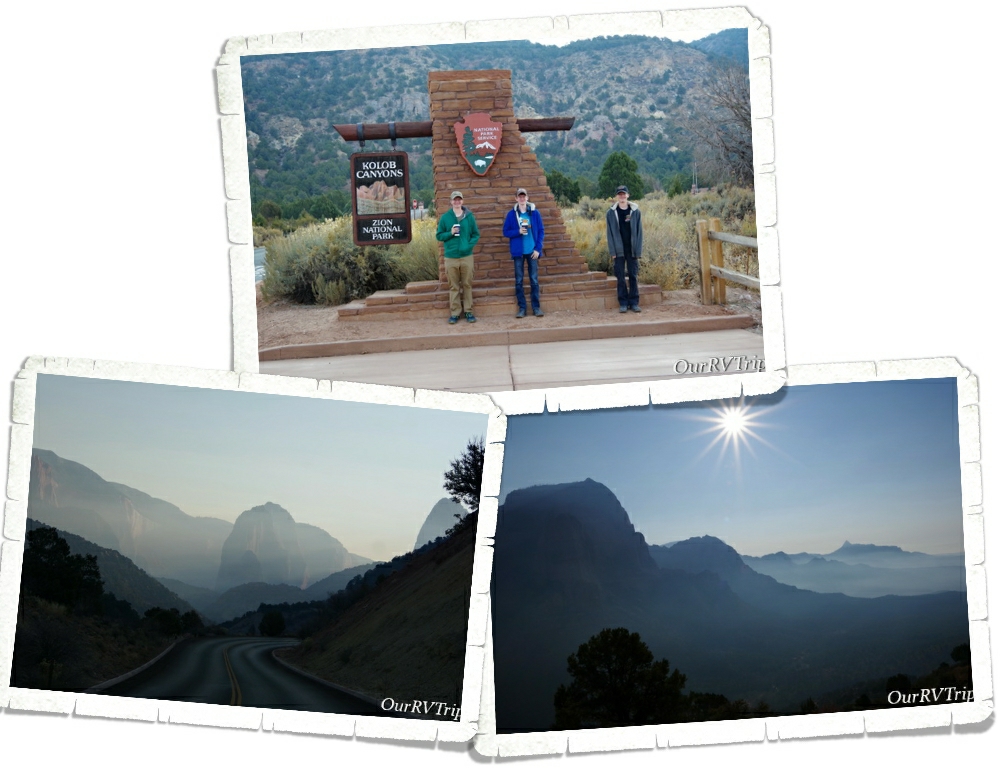
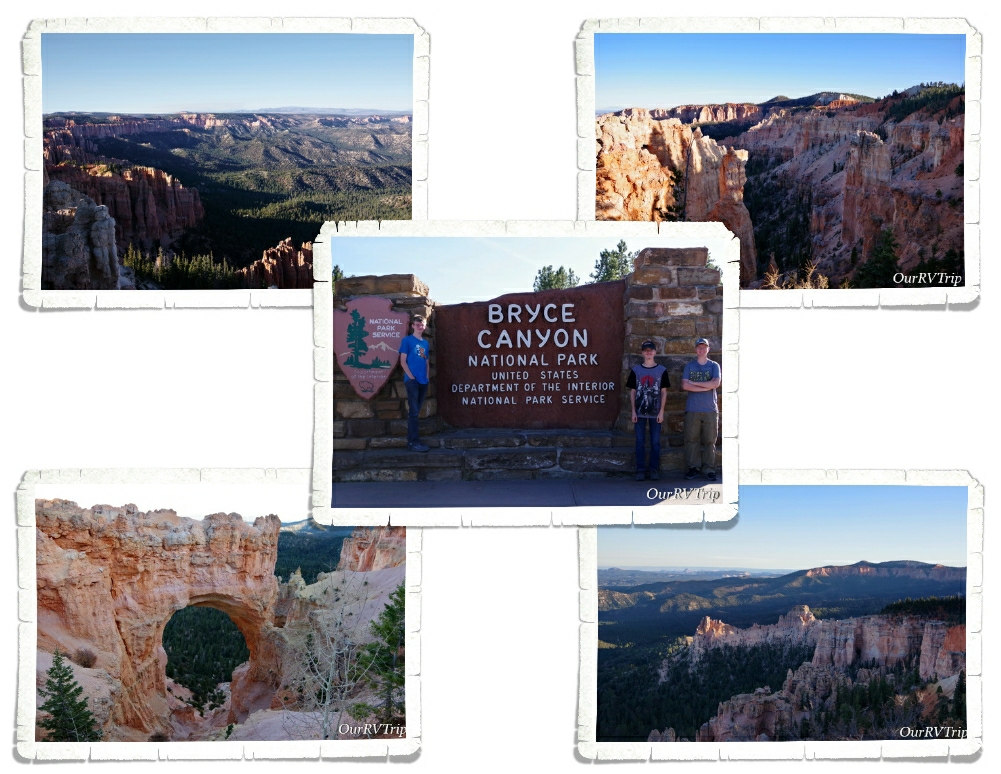
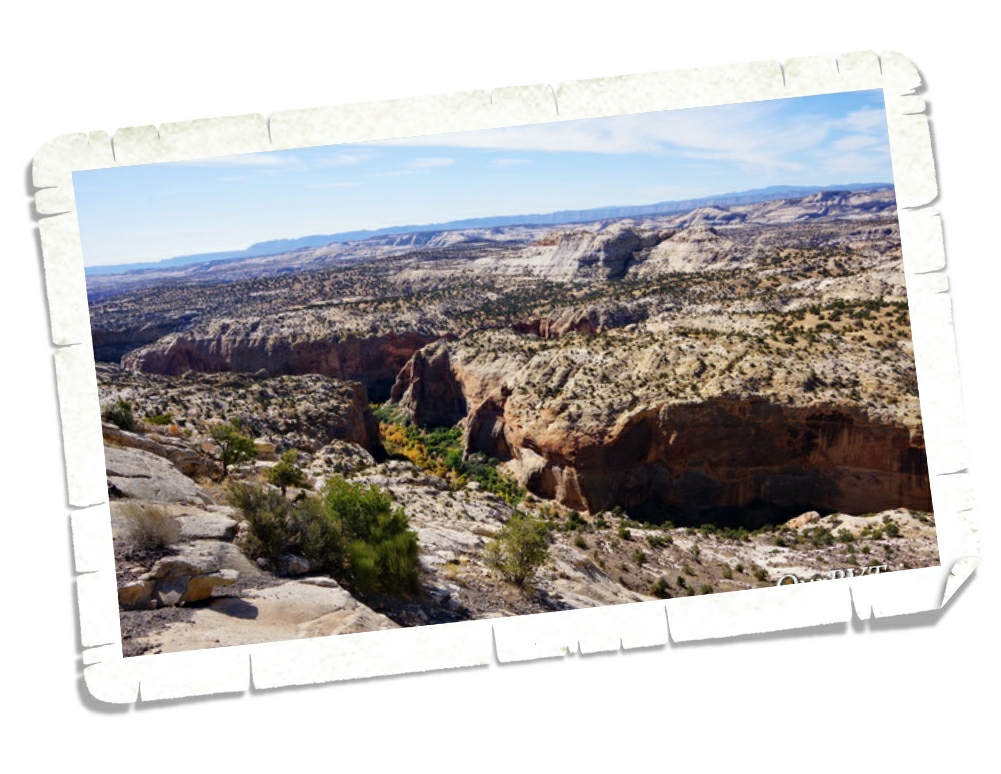
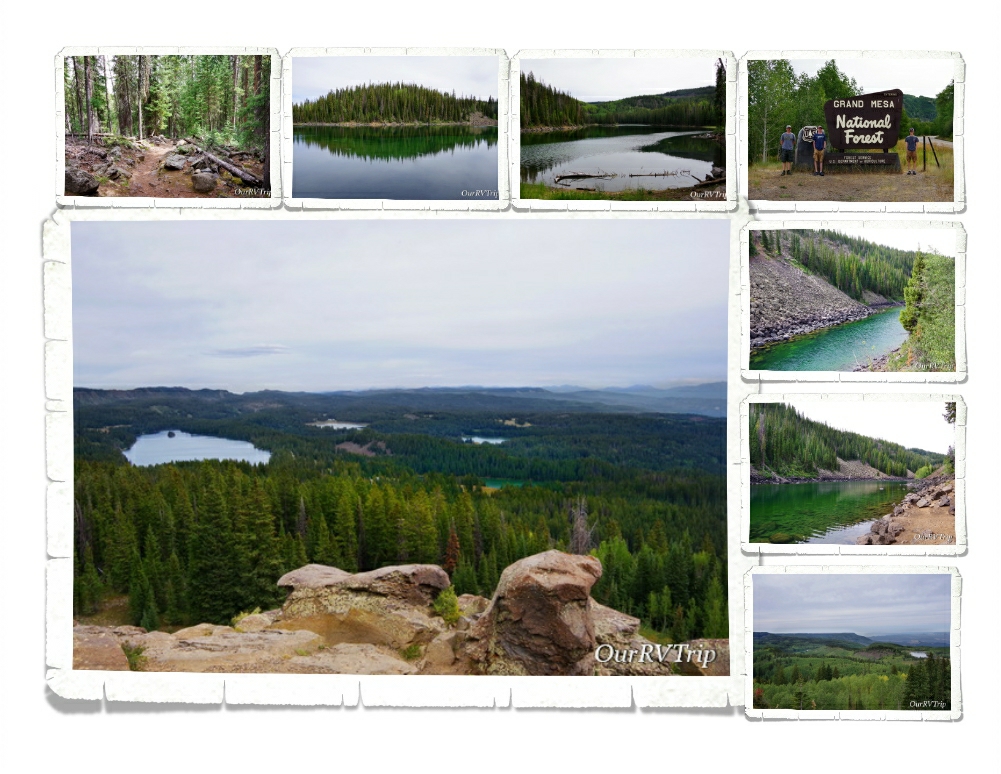
The second section we explored was Kolob Canyons. This section is about a thirty minute drive from the main canyon and has it’s own visitor center and ranger station. Because this section is so far away from the more popular Main Canyon, it sees fewer visitors. If you’re wanting to get away from the massive crowds…this is the place to go. You’re still going to see some people, but not nearly as many.

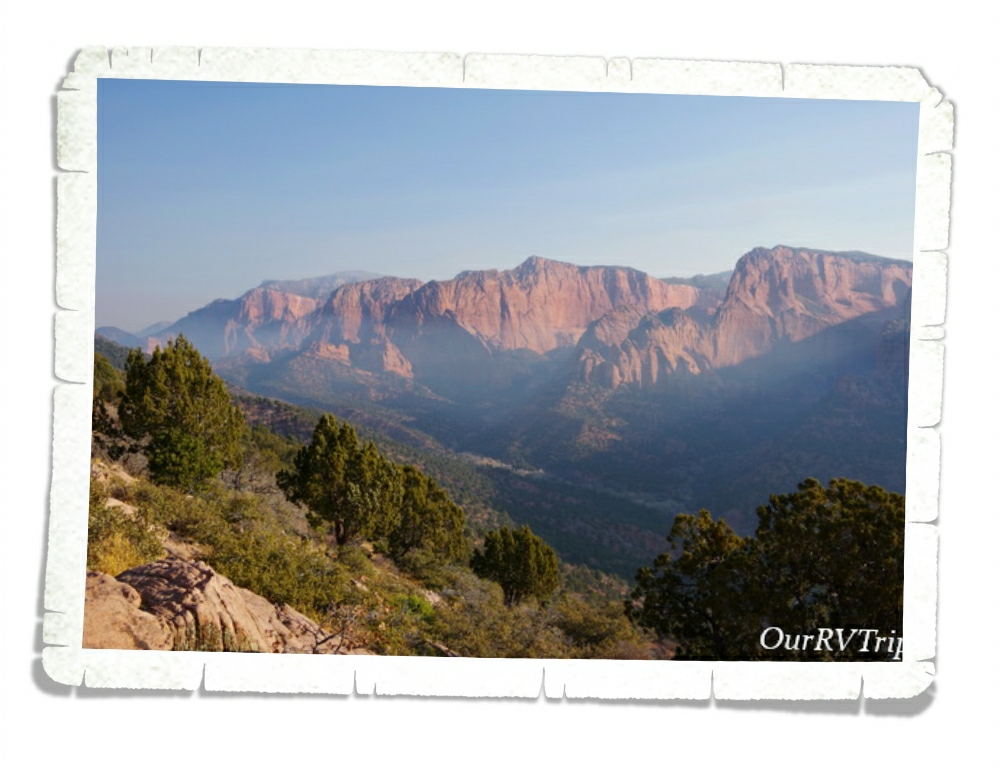
The day we went to Kolob Canyons it was super smoky as smoke from a controlled burn being held north of the park blew in. We wanted to make it back on a different day to see the canyon smoke free, but it just didn’t happen. Because of the smoke, we didn’t do much hiking. We did one small hike up to the Kolob Canyons Viewpoint. You can see from the pictures that it was really smoky so we didn’t dawdle too much here.

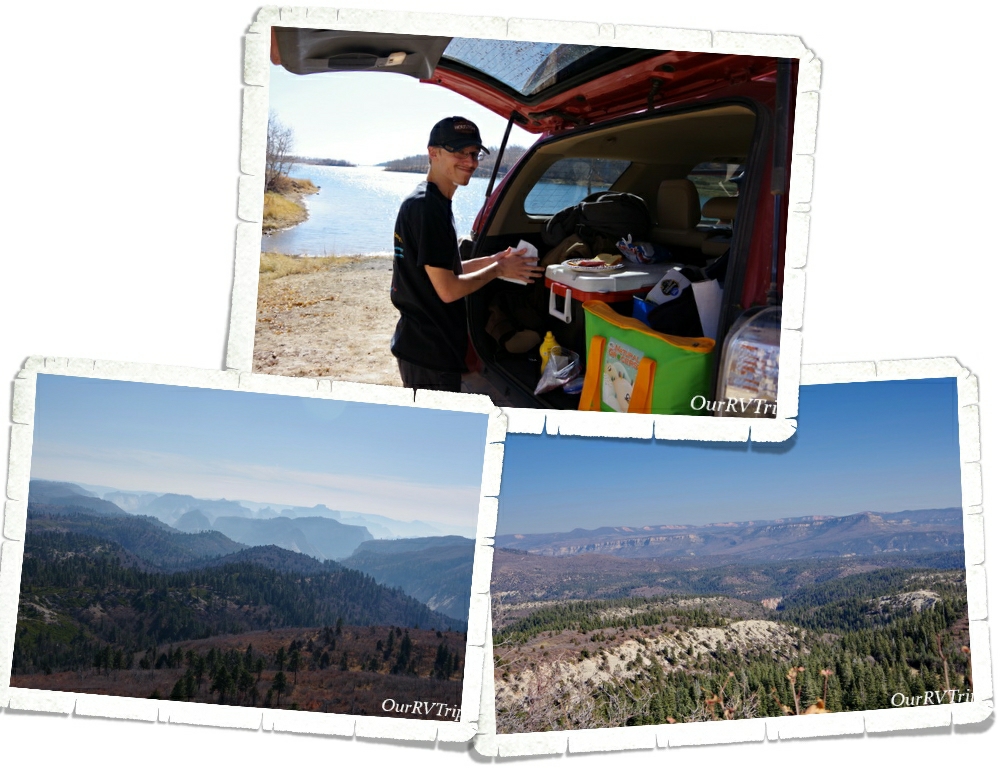
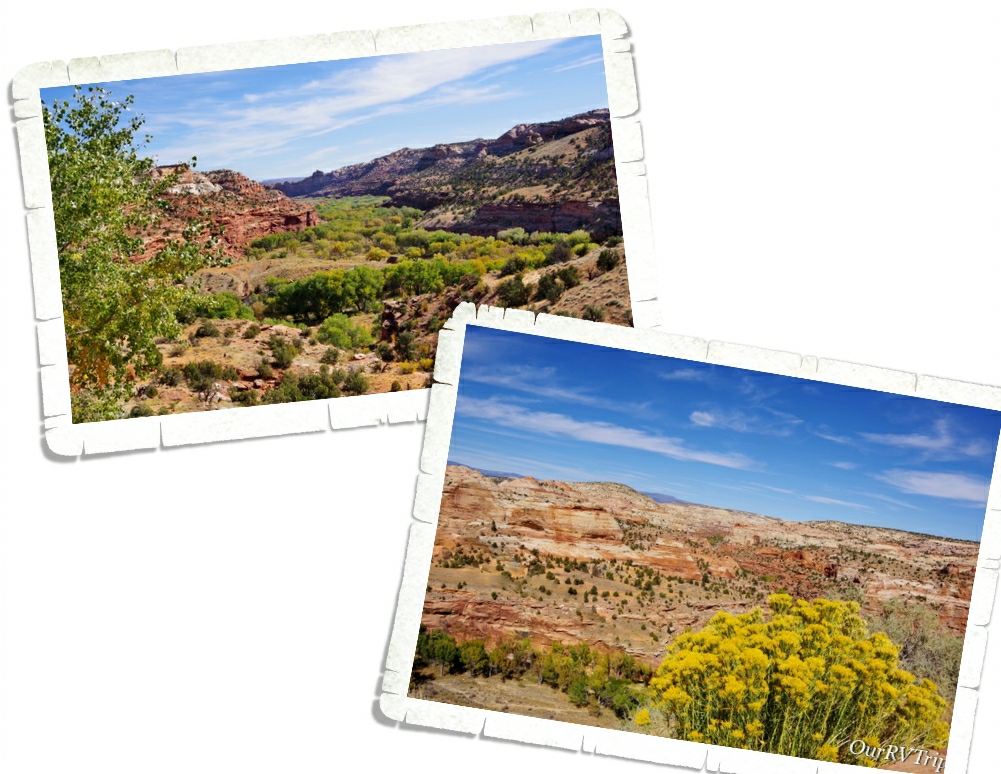
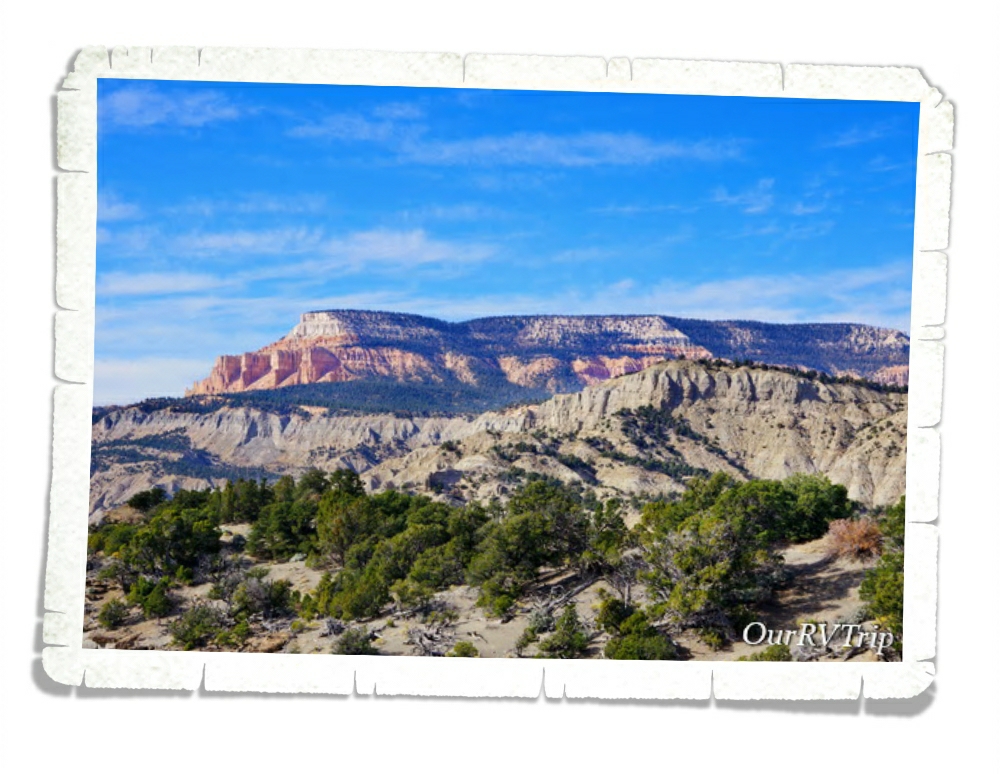
Kolob Terrace was the third section of the park we explored. We hit this section the same day we hit Kolob Canyon and you can see the smoke was still hanging around. This section of Zion is known mostly for the “Subway” hike. We didn’t do this hike…I’m not a fan of cold and the thought of traipsing through 32° water for hours on end…well…I’m going to pass on that every time.

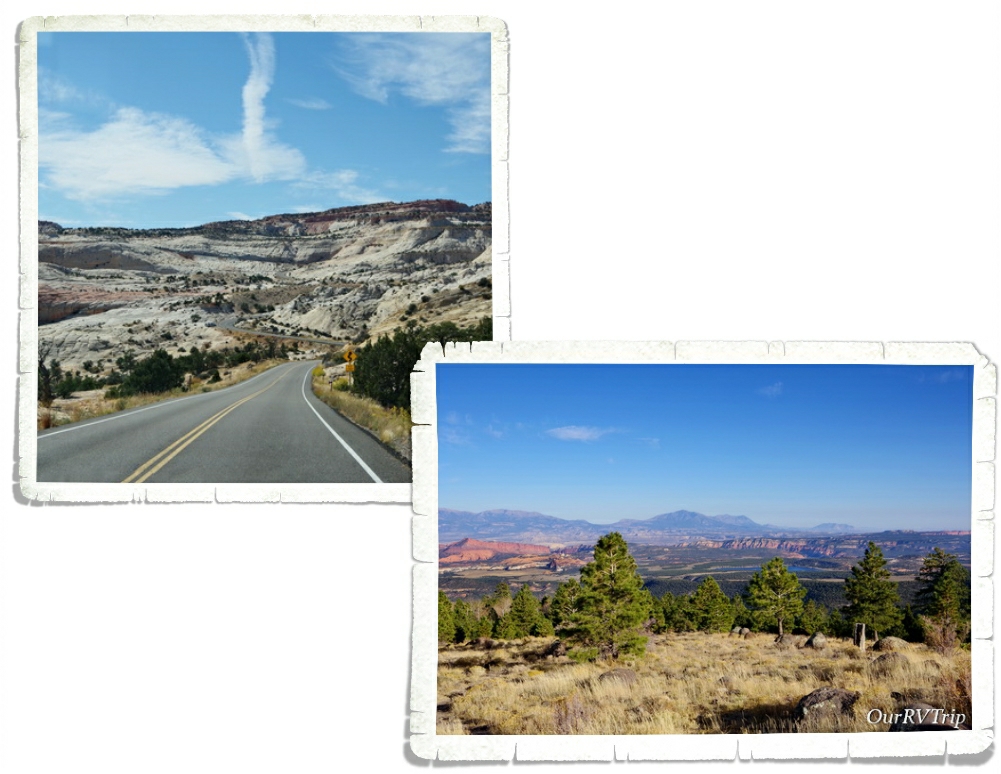
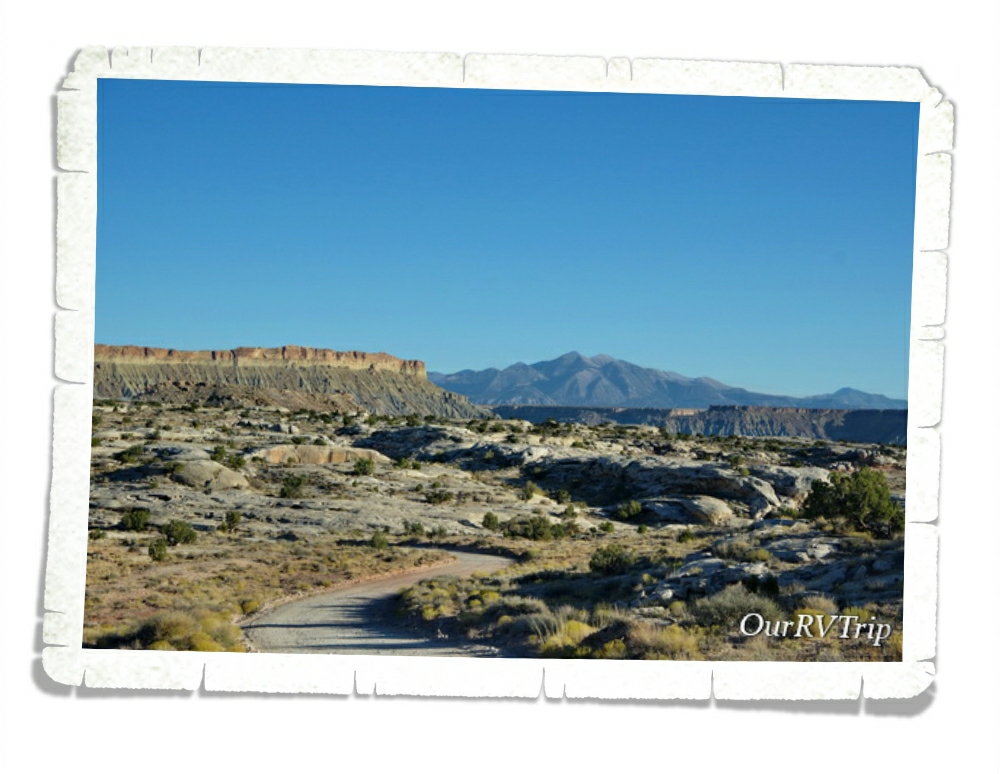
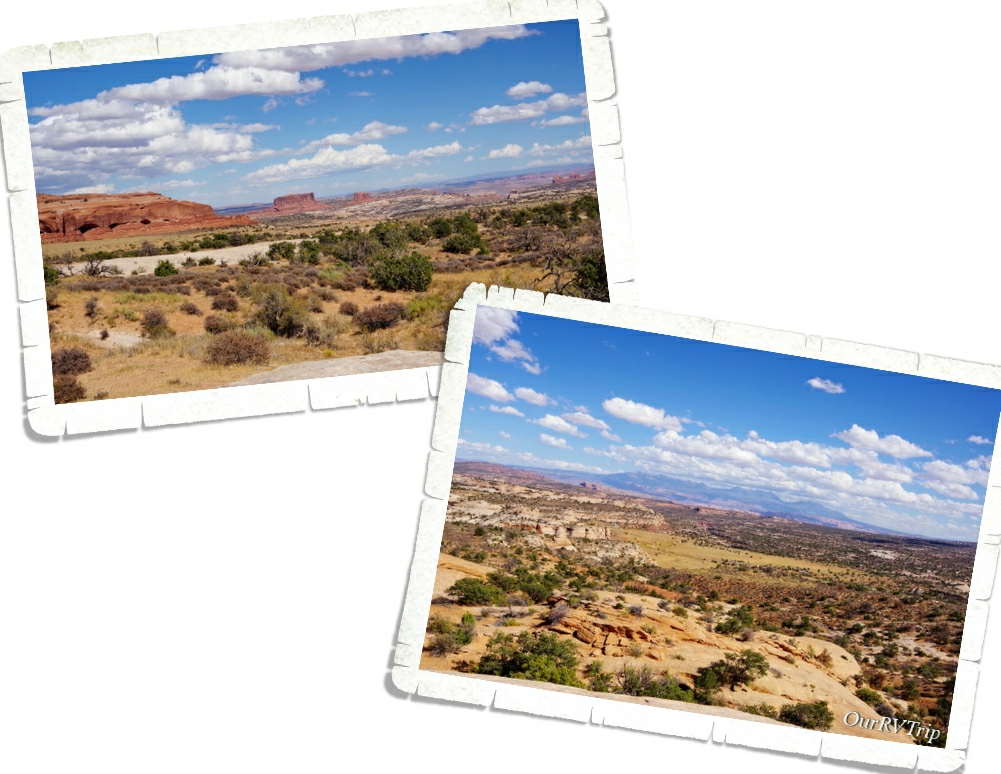
You can also find the highest point in Zion in this section. Lava Point. You can see the view from there in the pic above. You can also see a huge lava flow from there (not pictured). We meandered our way around Kolob Terrace and then drove up to Kolob Reservoir to have lunch. It was nice and quiet with just a few other people milling around.

The last section of Zion National Park we explored was the Maine Canyon. This section of the park is the most visited section where you’ll find hikes like Angles Landing, The Narrows, and the Emerald Pools. Our first expedition into this section was to work on the Junior Ranger Book and to familiarize ourselves with the park and shuttle stops. We got there late in the afternoon and the park was starting to clear out for the day. The Junior Ranger book had us stopping at each of the shuttle stops looking for specific things.

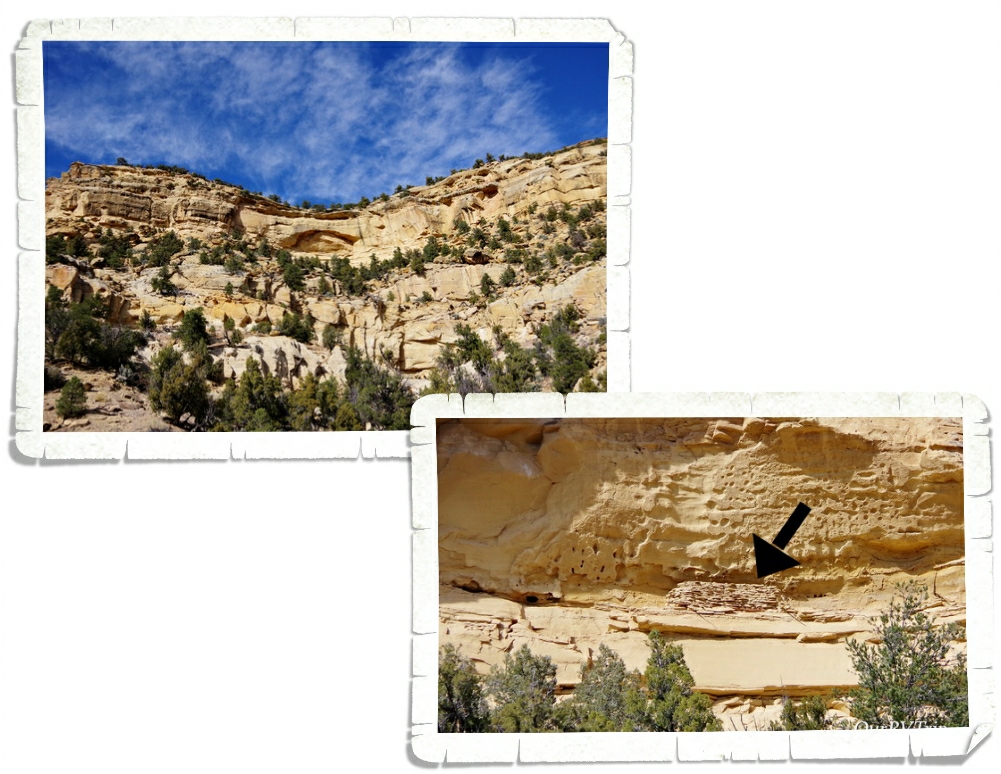
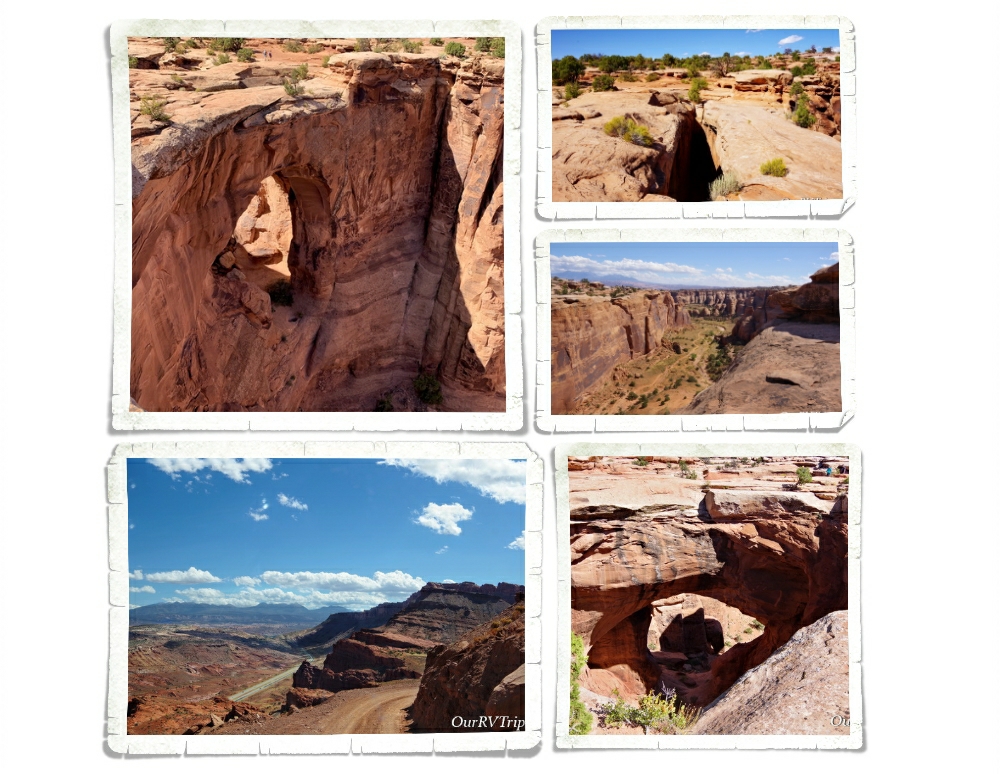
Did you know that there’s an arch in Zion? Actually, there are several. Crawford Arch is the easiest to see even if it is barely visible, but you can see it if you know where to look on Bridge Mountain.

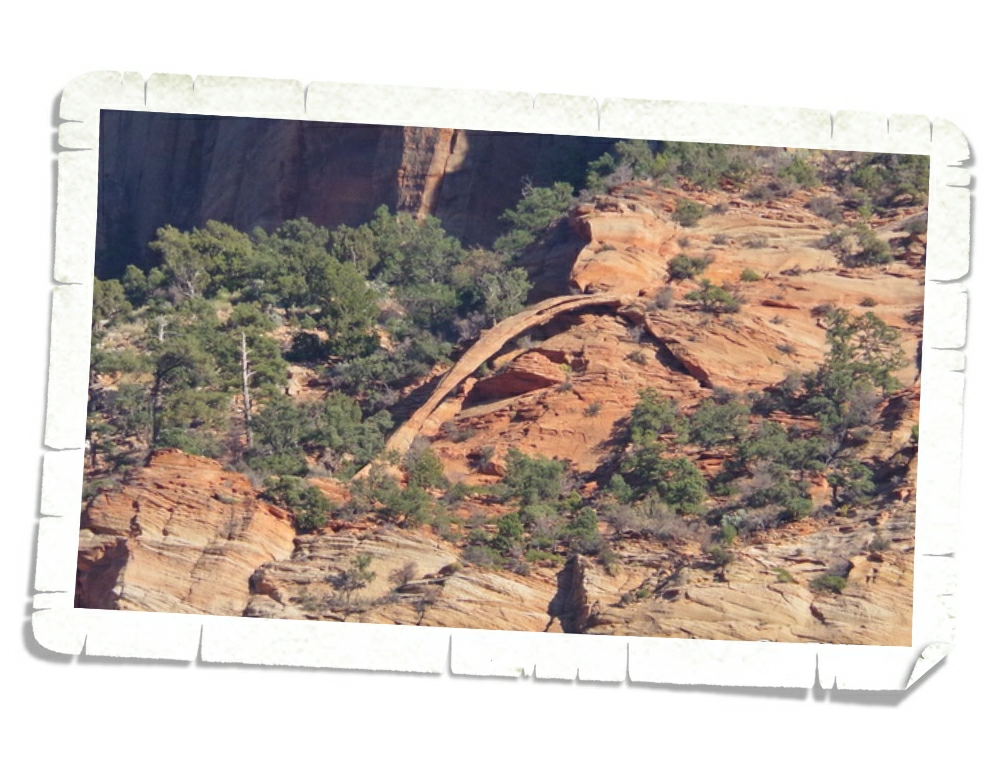
It took us a few minutes to spot it, but we eventually found it! For a long time, people thought it was a natural bridge…which is why the mountain is called Bridge Mountain.

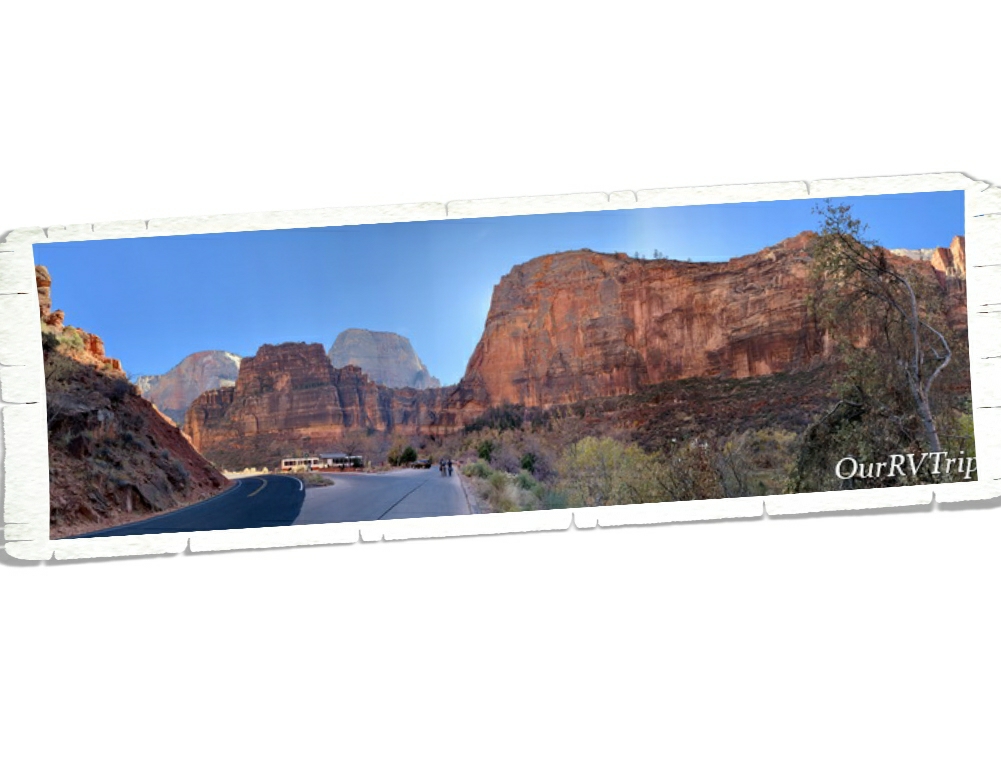
When we first found out we would have to ride the shuttle anytime we wanted to explore the main canyon, we weren’t thrilled. Our first two experiences with mandatory shuttles weren’t the best. Tons of people…all of them pushing to get on and off the shuttles…most of them in a bad mood…we avoid those types of crowds as much as possible. In order to try and cut down on the crowds, we went in and out of the park during odd times. Very early or later in the after noon seemed to be the best times for avoiding the biggest crowds.

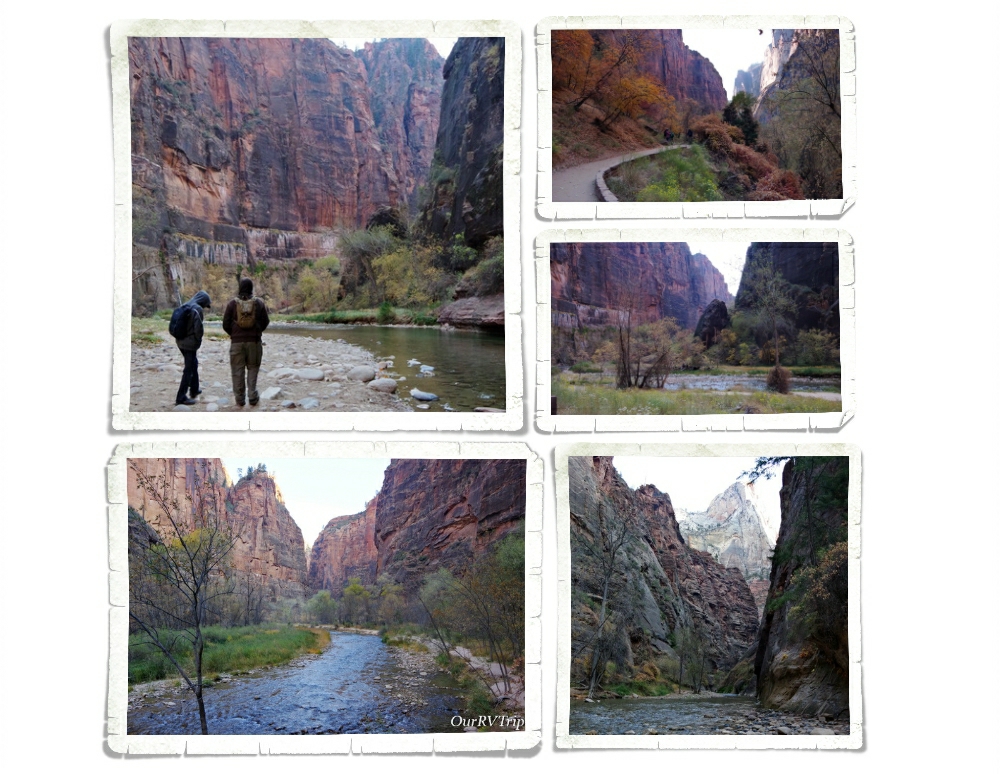
One of the hikes we did in Zion was the Riverside Walk Trail. This is the trail to get to The Narrows. It takes you along the Virgin River for a mile or so then the trail ends and The Narrows begins. This is a great hike for those of us who are curious about The Narrows, but don’t want to hike in freezing water. You can rent gear that’s supposed to help with the cold, but I talked to a few people as they were finishing this trail…and you still get wet…and it’s still cold. When we were there the water was right at freezing. We decided to save all of the water trails for when the water and the air (it was a balmy 40° while we were there) are both warmer.

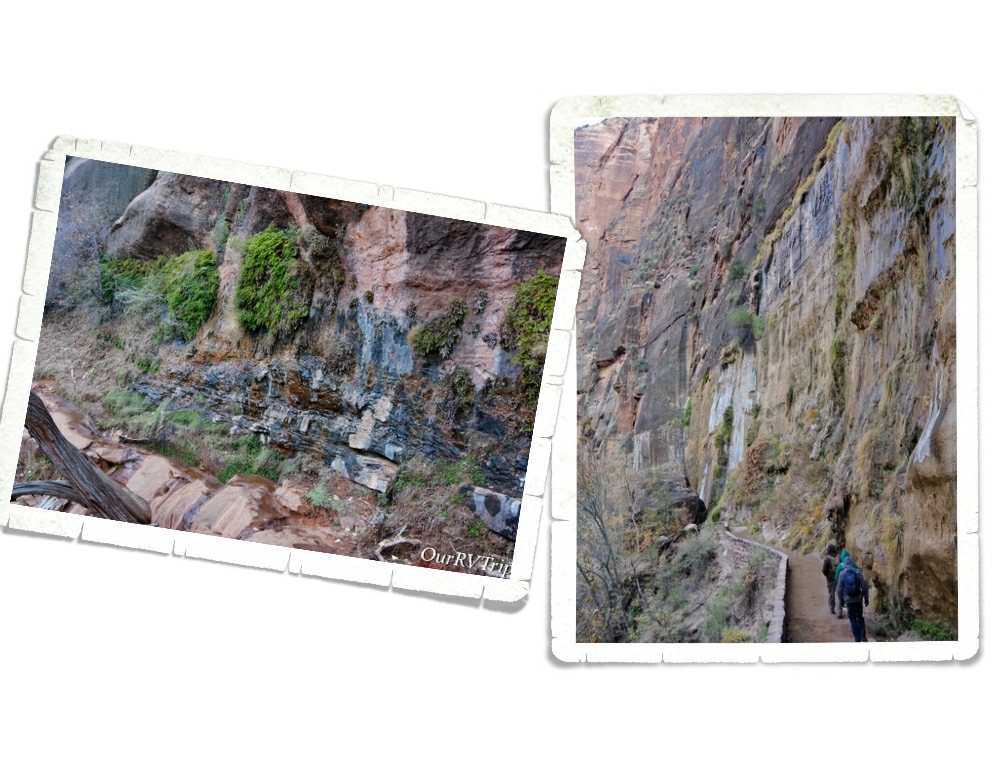
The Riverside Walk was a great walk in the park. Really, that’s what it was. The trail is paved and takes you beside the river the whole way. One of the coolest things you’ll get to see on this trail is a weeping wall. Zion is all about the weeping walls. I don’t have a good picture of a weeping wall…it’s hard to capture the right angle/shot of it to really convey what and how big it is. I’m not an expert photographer…I just point and shoot with a semi-fancy camera. So, what the heck is a weeping wall? Well, a weeping wall is when the water that is seeping down from the top of a sandstone (or really any) rock can’t get through the stone going down anymore so it goes sideways…and forms a weeping wall…or sometimes it’ll form a spring. Usually on weeping walls you’ll find hanging gardens that are just…magical. Seriously…it’s amazing stuff.

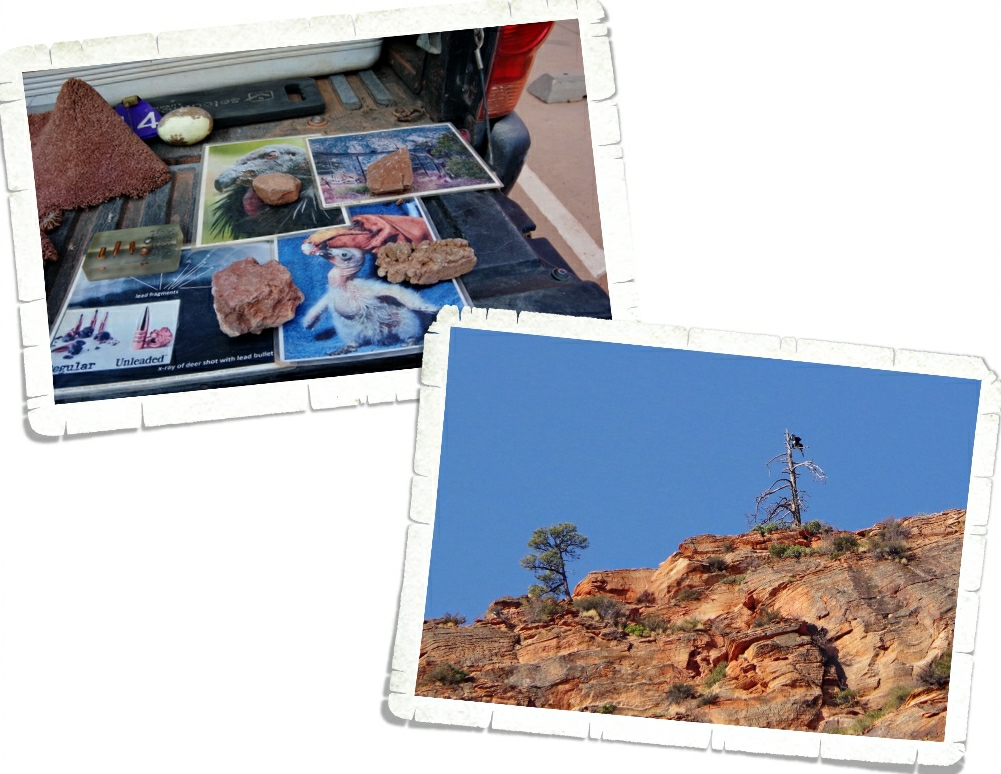
One of the neater things you can do at Zion right now (or at least when we went) is see a juvenile California Condor. Chick #1000 and its parents were sticking around shuttle stop number eight. We stopped by a couple of times and were rewarded with a few views. The Ranger that was posted there told us that if one of the adult California Condors were to fly down and land next to us, they would stand at 4′ tall. Guys…I’m 5′. Those area some seriously big birds! In the right picture you can see one of the parents sitting near the top of the tree.

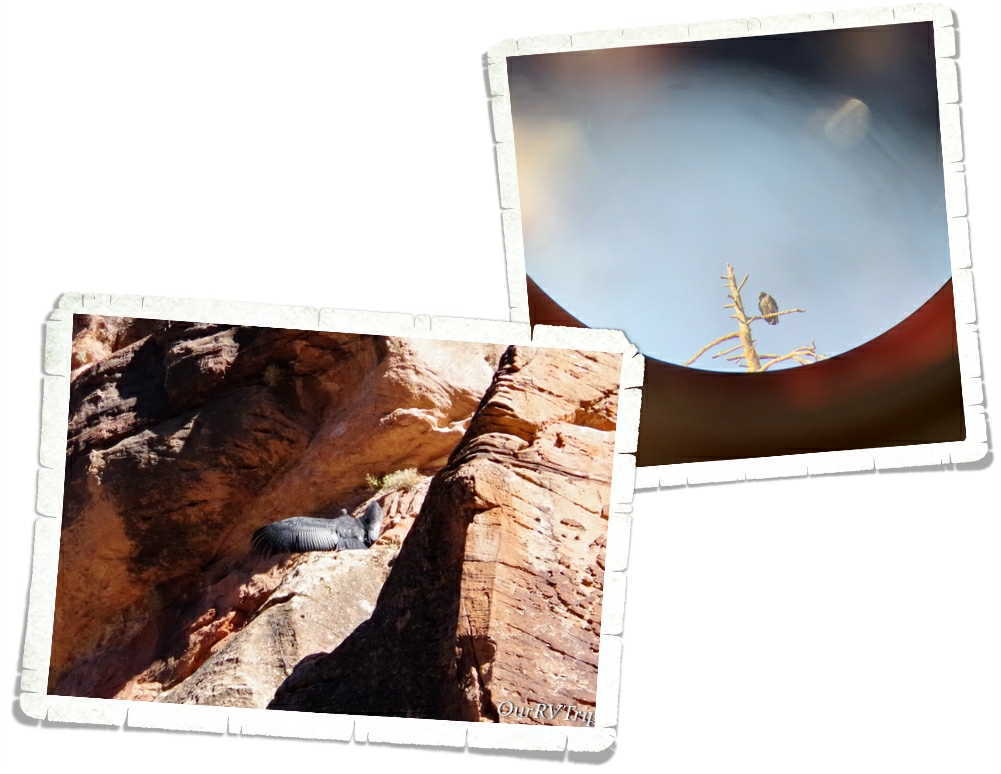
In the right picture you can see the adult condor a little better. I tried to take a picture through the scope the Ranger had set up. In the left picture, you can see the juvenile chick #1000 sunning it’s wings. It was fun to see these big birds. While we were there one day, one of the other visitors was telling us how he had been on the team who caught the original California Condor transplants. He got a little emotional talking to us about it all. It was a treat to see it all through his experiences with the birds.

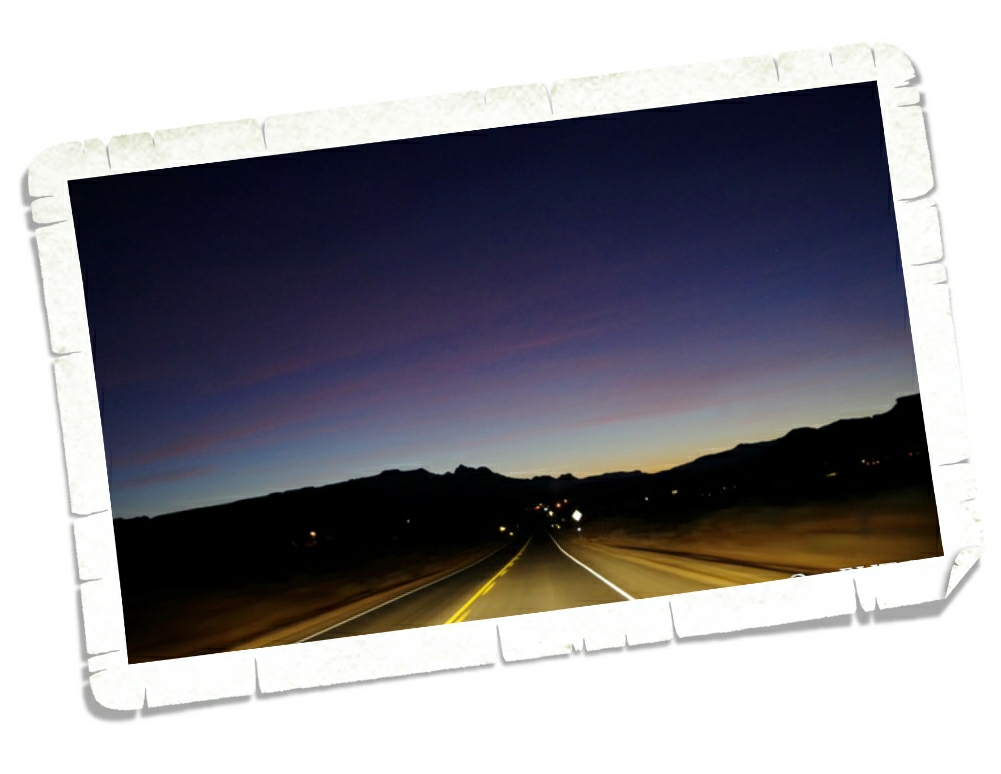
For those of you who know me…you know that I’m not a morning person. Not even a little. And if you’re wondering…this (the picture above) is what the butt-crack-of-dawn looks like. We got up way too early on our last day in Zion to do the Angels Landing Trail. We wanted to be on the first shuttle out that day so we could beat some of the crowd.

We made the very first shuttle out that day. It wasn’t packed, but it was pretty full. Most of us were going to one of two hikes…Angles Landing or The Narrows. You could tell which hike a person was going on based on whether they were wearing water proof gear or not.

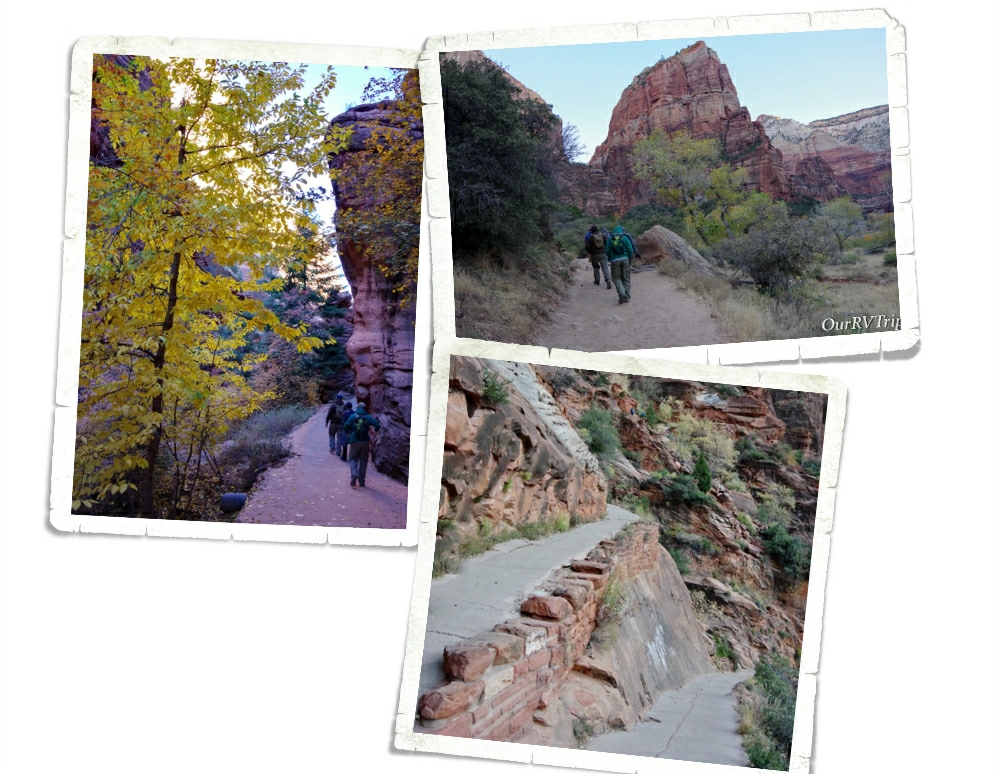
I’m a slow hiker. I’m slow going up due to lack of being able to breath (I’m out of shape…and love my foodies) and I’m slow going down (I have a thing about slipping on a trail). And…I’m always stopping to take pictures…of everything. So I knew it would take me longer to get up this trial. Some of these switchback are close to a 15% grade…which doesn’t sound like a lot, but when you’ve been walking at a constant up for close to two hours…15% feels more like 75%.

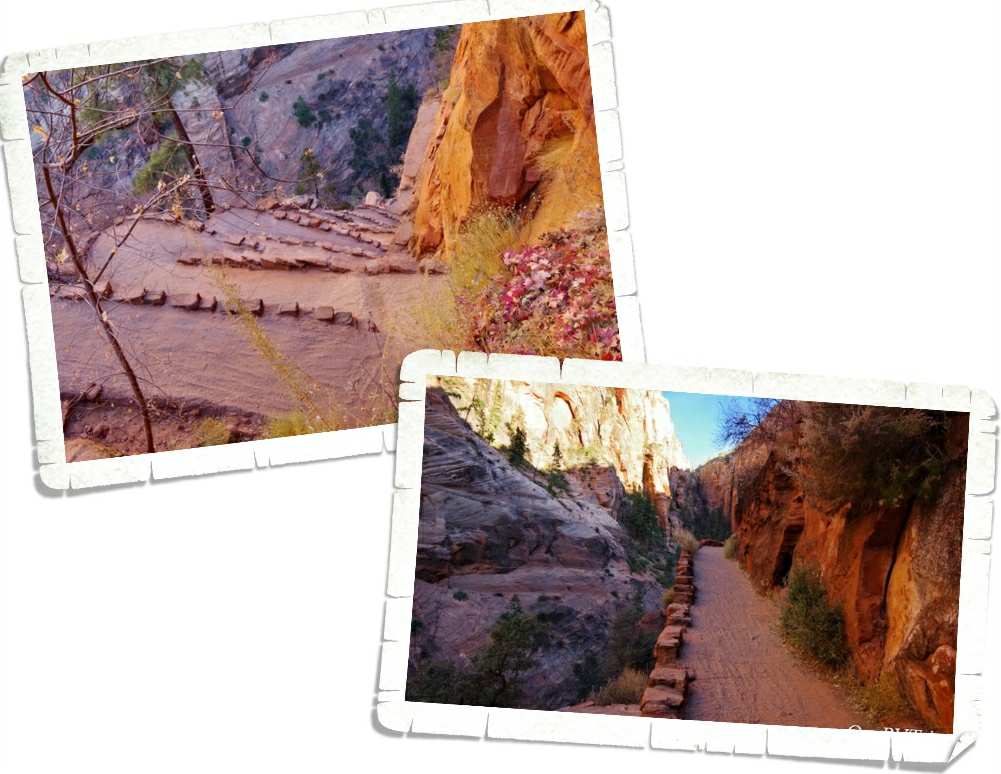
We got through one set of switchbacks and thought we were almost there when we found the second set of switchbacks. I think this second set is called Walter’s Wiggles. They were even steeper than the first set. Everyone on our shuttle had passed us by this point and the people on the next shuttle were starting catch up and pass us…but really, the trail was pretty empty. It was still super early. The lighting was starting to get to that amazing golden hour lighting that makes everything pretty.

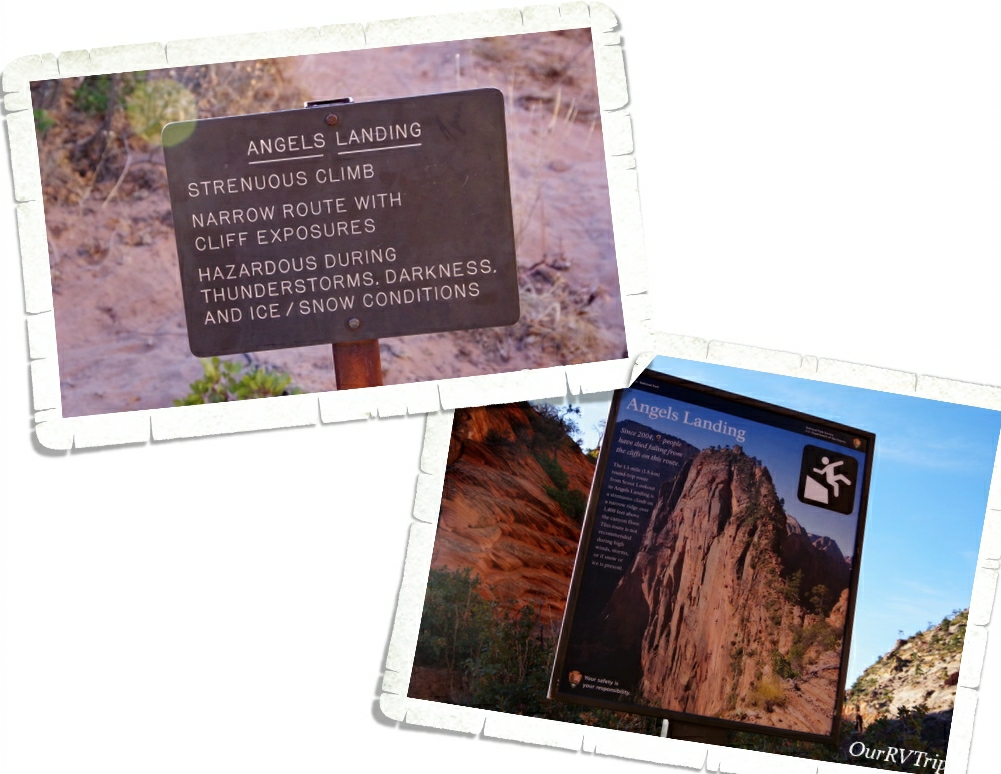
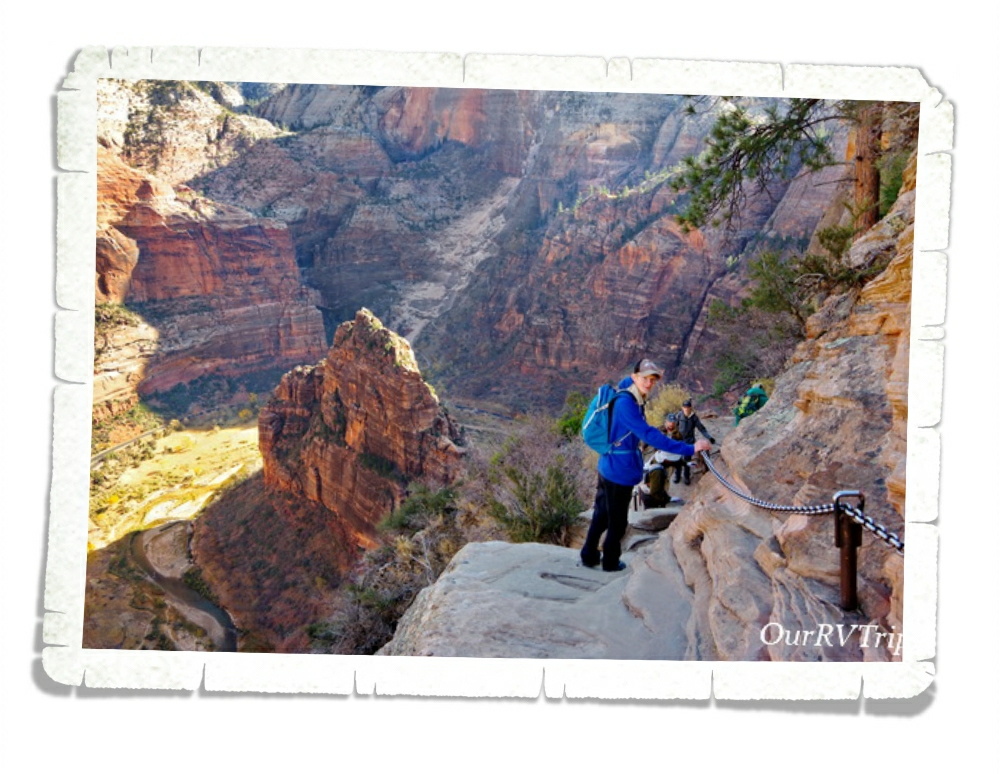
So…I had mixed feelings about taking the boys on this hike. Angels Landing is a dangerous hike once you reach the chains section of the trail. Until then…it’s just switchbacks and anyone can do it. But the chains section…it’s serious. People fall of this section every single year. We had several talks with our boys about this section and we were confident that they wouldn’t mess around or get distracted. One mess up…one wrong step…it wouldn’t be good. I honestly think this hike should go to a permit based system that has an age requirement of 14. As Zion gets more and more popular the crowds on Angles Landing get worse and worse.

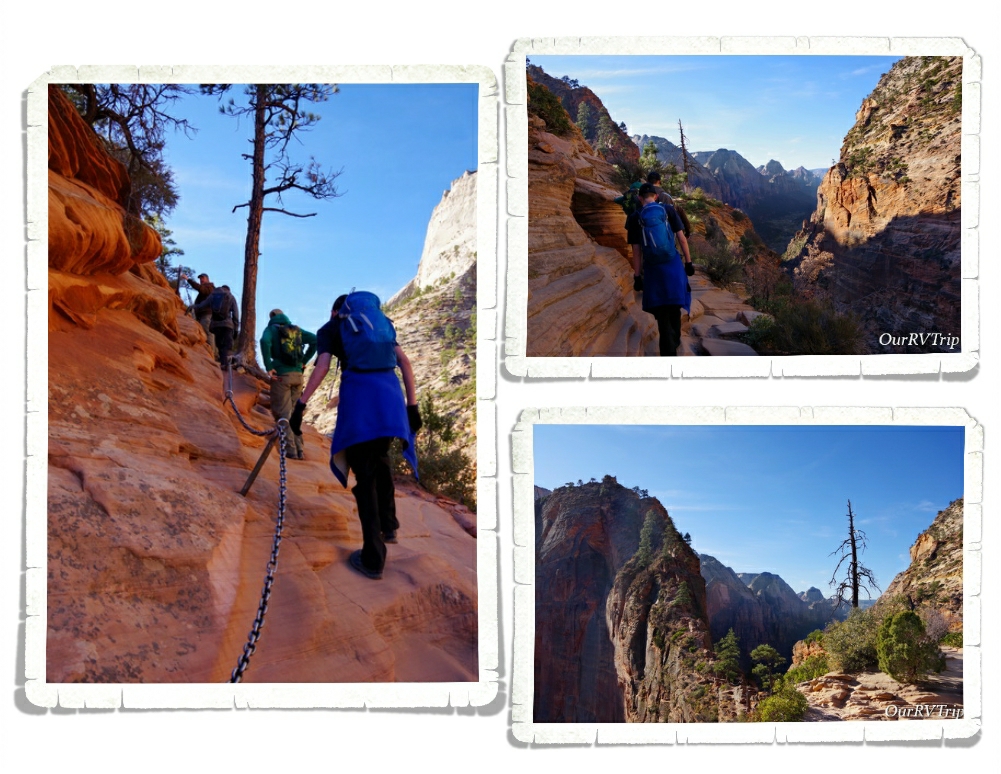
We decided that at any time one of us felt like we couldn’t go on with this hike that we would all stop and turn around. Zion has bolted chains into the rock pretty much the whole way up to the summit of Angles Landing, but when the trail is crowded and you have to go around other people on the trail…then there are times when you might have to let go of the chain. That’s another reason we started so early. I didn’t want to deal with crowds on the chain section. In fact, we wouldn’t have done the chains section if it’d been really crowded.

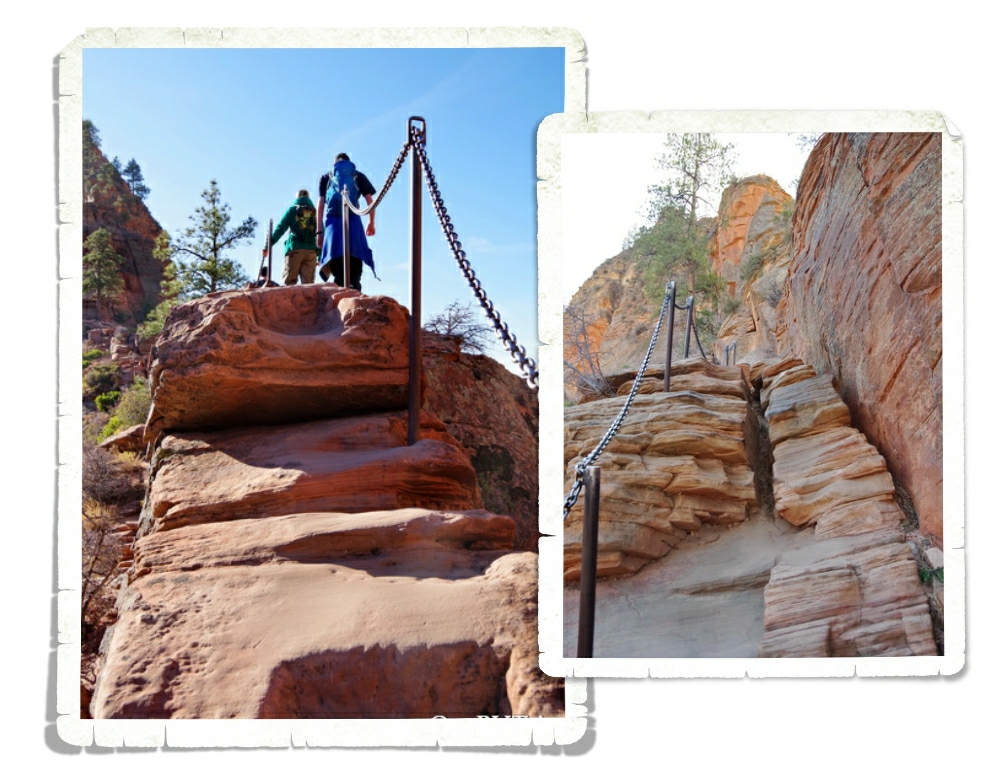
We only had a few people coming down as we were making our way up and each time it was at a place that was a little wider so hanging onto the chains wasn’t imperative. I didn’t take as many pictures or videos on this hike as I would have liked to…I took them when I felt like it was safe, but didn’t want to mess with my camera or my phone very much.

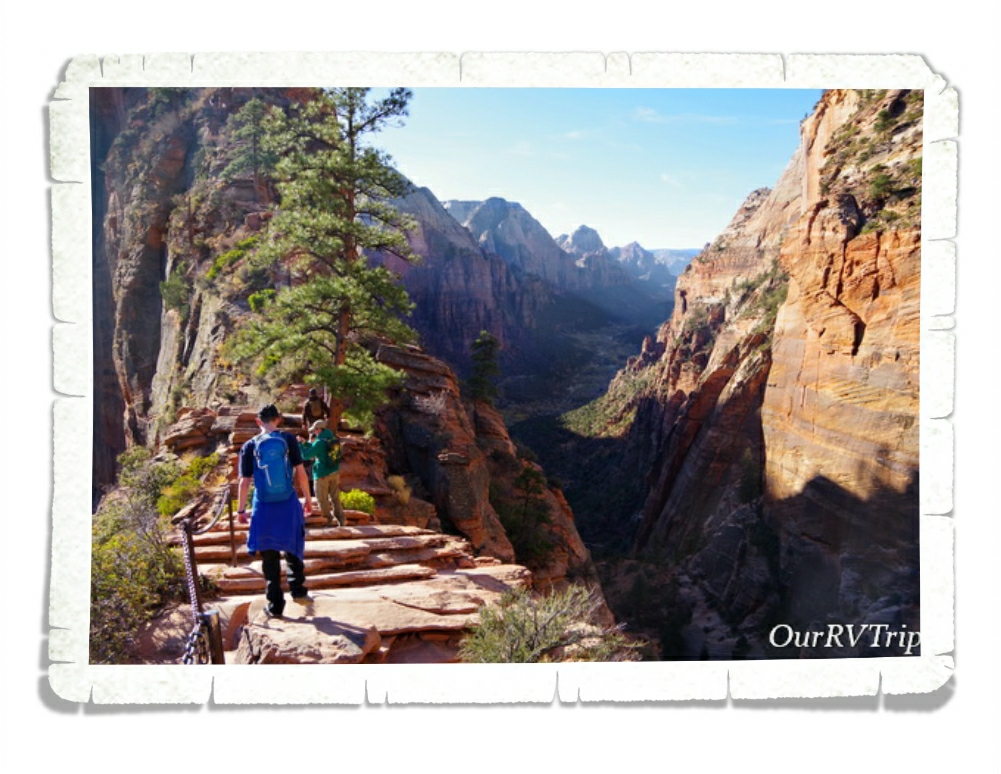
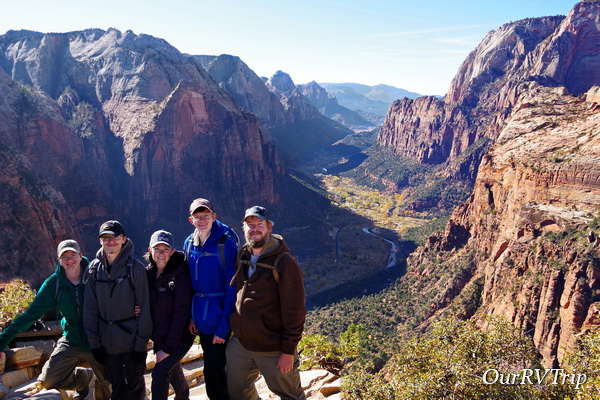
It’s only two and a half miles to the top of Angels Landing. There’s an elevation gain of close to 1500 feet. There were several places on the trail where I’d pause to try and breath and I’d look to the side and would have my breath taken away by the view. I can’t tell you how many times I said wow during this hike. The picture above is one of my favorite pictures I took during the Angels Landing hike. It was taken at one of the wider spots on the chain section and it was during one of those “wow” moments.

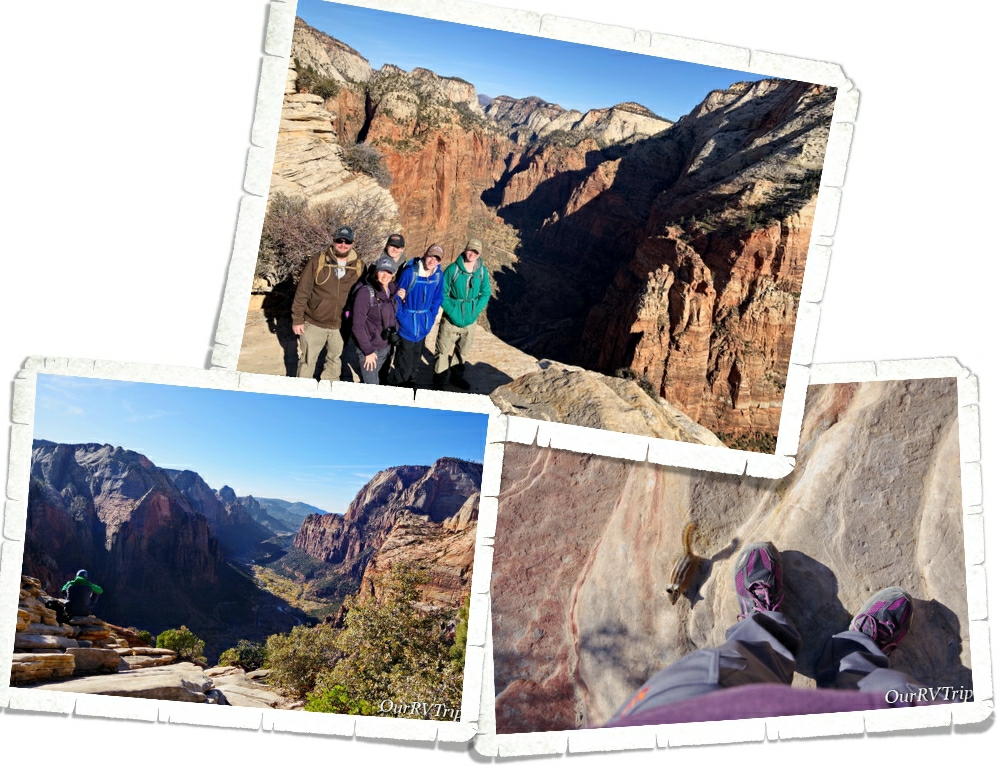
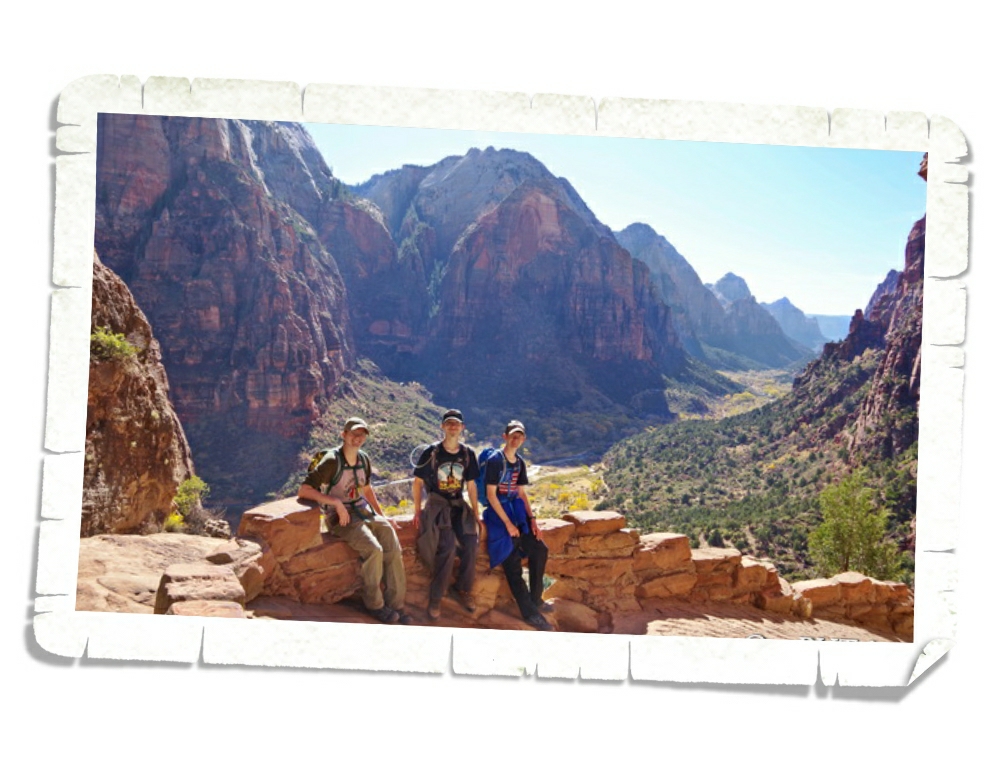
When we made it to the top we had some amazing views! And there were only about twelve other people up there so it wasn’t crowded at all. We took our time ogling the views and taking pictures then sat down and had a snack before heading back down the trail. There were these cute little squirrels running around the summit. They weren’t shy at all! They would run up onto people to see if they could get a bite of whatever the human was eating. We could have stayed up there for hours but we wanted to get back down the chain section before it got crowded.

Thankfully, we didn’t start seeing a lot of people on the trail until we were close to the end of the chain section. We saw more people as we were going down than we saw when we were going up…but it still wasn’t bad at all.

When we got to the area of the trail called Scotty’s Landing, the crowd was pretty bad. There were probably close to a hundred or so people milling about trying to catch their breath before heading up to the chain section. We passed tons of people going up as we made our way down the switchbacks and we all agreed we’d made the right choice when we woke up sooo early to do this hike before it got crowded.

Even though Angels Landing was only a five mile hike, it was one of the hardest hikes we’ve done. And not just because of the physical aspect of it…this hike takes a lot of mental fortitude during the chains section. You have to pay attention…and me being the mama bear that I am…I was constantly watching and worrying about my kiddos…and my partner-in-crime who has trouble with heights. I wouldn’t even consider taking my kids on this hike before the age of 14. They all did awesome. None of us wavered in our desire to make it to the summit. We’ve talked fondly of this hike quite often since the day we did it (as I’m writing this post, it’s been close to two weeks since we did the hike) so it shouldn’t be a surprise when I tell you that this hike is on our top five favorite hikes. It’s firmly in the number two slot, coming in right after…The Harding Ice Field Trail.

Here’s a fun little tidbit for you…The reason it’s called Angles Landing is because back in 1916 a group of people traveling through the area commented that it was so high only an angle could land on it. The trail to the summit of Angles Landing was made in 1926. It’s become so popular that during busy times at the park, you might have a three hour wait to get to the chain section of the trail.

That’s all I have for you on Zion National Park. We totally fell for this park… so much that we’re trying to decide if we’re going to change our plans for Spring of 2020 so we can spend a little more time there as we head north from Arizona.

That’s it Guys! That concludes the Utah section of our National Park Tour! We spent an amazing two months in Utah exploring and found some of our favorite parks/hikes. Utah…we will be back!

See y’all down the road!

#NationalParkTour

Slot Canyons, Petrified Wood, and Sand Pipes… Oh My!

Slot Canyons, Petrified Wood, and Sand Pipes… Oh My!

Hey Guys! While we were in the Panguitch area the weather was so cold, but we didn’t let that stop us from exploring! We crammed in a National Park, two National Monuments, and two State Parks all in the two weeks we were there! This is the second post of our time in Panguitch, UT…let’s get started!

It’s not considered one of Utah’s Big 5…but it really should be on your list of must see National Park Units to visit while you’re in Utah. Grand Staircase-Escalante National Monument is so big (somewhere around 1.9 million acres) with so many diverse things to do and see…it’s easily one of our favorite NPS units. This National Monument is BLM managed so I think it tends to fly under the radar of most National Park enthusiasts.

We got a taste of what a slot canyon is back at Little Wild Horse Canyon a couple of weeks before we got to Panguitch and we all loved it! The Peek-a-boo/Spooky slot canyon loop has been on my list for a while and I was really excited to finally get the chance to explore them. These are family friendly slot canyons…meaning, you don’t need technical gear or experience to explore them. They are still slot canyons though…so there’s some scrambling, climbing, and squeezing involved. To get into Peek-a-boo, you must first climb up a twelve foot entry wall. There are a few hand and foot holds that help a bit, but it’s still difficult. I wouldn’t have made it up on my own…Jerl had to help pull me up part of the way. But we all made it up!

Peek-a-boo was so fun! You had to climb through holes, squeeze between walls, and work your way around some easy and fun obstacles. It was like a playground. Grand Staircase-Escalante is divided up into three distinct sections. In the Canyons of Escalante section, you’ll find the most extensive network of slot canyons in Utah.

Once you make it through Peek-a-boo you climb up and out of it and follow the trail over to Spooky to continue the loop. Or you can retrace your steps and go back through Peek-a-boo to get out the way you came. Grand Staircase-Escalante is a unique park. It’s considered the flagship unit of the newly established National Landscape Conservation System. This new conservation initiative’s goal is to basically preserve the wildness of the land. You won’t find defined trails like you will in other NPS units. While there are trails, there is minimal change to the land. So, you’ll need a map and you’ll have to watch for the cairns that have been built on some of the trials. The trial system isn’t as defined as what you might be used to.

Once you reach Spooky, you have to make your way down a fifteen foot drop. Like I said…it’s still a slot canyon and you’ll still have to do some climbing and scrambling. This drop was the hardest part of the whole loop for us. You’re coming out of the bright sun down into a dark canyon so it was hard to judge where you were and how far of a drop it was. Jerl went first here and helped the rest of us down. He also might have cracked a rib or two here…

Once we all made it down the drop, we caught up to a big group that was in front of us and so we had to wait while we were in some of the tightest sections of Spooky…which are ten inches wide. Ten inches. If you’re claustrophobic at all, I would suggest skipping Spooky. If I started to feel a little closed in, I would just look up at the blue sky. It helped quite a lot knowing if I absolutely had to, I could climb up the canyon walls to get out. They were narrow enough and they weren’t so tall that I couldn’t have made it. There were places that Jerl had to exhale in order to squeeze through. Always research the hike you’re going on and know what you’re getting yourself into.

I have to give a shout out to Tanya from Florida. When I saw that first climb up into Peek-a-boo…I thought briefly about copping out. It was intimidating…especially with an audience. But, she totally called me out…and said we can’t wimp out now after coming all this way. And she was totally right! The group of people we found ourselves exploring these slot canyons with really made the hike so much fun. We all helped each other and encouraged one another to make it through. So, thank you Tanya from Florida for pushing me to not wimp out!

The Dry Fork Narrows where Peek-a-boo and Spooky Gulches are found is the perfect way to experience Grand Staircase-Escalante National Monument the way it was meant to be…wild and free. Go be adventurous. Step outside your comfort zone and find out who you really are. But, always know your limits and be prepared when you’re out in the wilderness. If you’re going to explore a slot canyon…or really any canyon…be weather aware. There was a sign at the beginning of this hike that said the two most common causes of death are dehydration and drowning. Don’t go if it looks like it might rain anywhere in the area and always take plenty of water.

The last thing we did in Grand Staircase-Escalante National Monument was go see Grosvenor Arch. Like everything else we’d done in this National Monument, the drive to get there was on a dirt road. Ten bumpy and washboard miles down the road, you reach the little pulloff for Grosvenor Arch. You can see it from the parking lot, but if you want a closer look at the arch you can take the little “paved” trail out to it. We didn’t walk out there. I feel like the best view of an arch is from a distance. This arch is actually two arches that tower about 150 feet above the ground.

We had so much fun learning about and exploring Grand Staircase-Escalante National Monument!

Kodachrome Basin State Park is known for it’s sand pipes and it’s red rock sandstone chimneys. Kodachrome was named by a National Geographic Society Expedition back in the late 1940s. They named it in honor of Kodak film for it’s color.

We did the Angel’s Palace Trail to catch some views of the sand pipes, hoodoos, and chimneys that the park is so known for. There are over sixty sand pipes that range in height from 6 to 170 feet throughout the park. This is a pretty easy, well marked trail that offers some fantastic views of the park and the surrounding area.

Kodachrome Basin is located on the Colorado Plateau. Most of the layers exposed in the park are made of the Carmel Formation (the white rocks) and the Entrada Formation (the red rocks). While scientist know what the sand pipes are made of…they’re not really sure how they were made. There are a few different theories out there, but no one has been able to prove exactly how these unique rock formations were formed.

While we were exploring Kodachrome Basin State Park and Grosvenor Arch which are on the same road, we kept running into this group of cowboys (and girls) doing a roundup. They were moving their herd from the summer grazing field to the winter one. It was really neat to watch. We first encountered them on the way into Kodachrome, then caught up with them on the dirt road out to Grosvenor Arch…then met up with them one more time on our way back out. The cows didn’t think much of our car and they weren’t too inclined to walk around us. lol! A few of them bumped our car as if to say…”Hey, we’re walking here”… I think a couple of them were trying to hitch a ride on our bumper as we slowly moved through the herd. We stopped and asked the owners if we could drive through them…we were prepared to follow along behind them, but the owner assured us it was fine to drive next to them.

One day while we were driving around the area, we encountered three of these gorgeous Golden Eagles. Three! I, of course, didn’t have my good camera on me…and like the doofus I am, I just sat there too dumbstruck to even think of whipping out my phone to catch a video. We watched three giant golden eagles fight over something that one of them had just found in a field. It was…unforgettable.

We stopped by Escalante Petrified Forest State Park late one afternoon on our way back to our home-on-wheels after a long day of exploring. We always take the chance to see petrified wood. On top of a mesa that used to be the bottom of an ancient flood plain, you can walk a trail and see several specimens of petrified wood. The trees this wood came from were standing close to 100 feet tall around 130 million years ago. One of my favorite things about petrified wood is the variety of colors! The minerals in the soil determine what colors you get. For example, iron oxide will produce an orange, red or yellow coloring while manganese oxide tends to create blue, black or purple coloring. Yes… we’re nerds…we know things like that. Ha!

We had the honor of being featured in the November/December 2019 issue of Escapees Magazine. The whole process was a really fun learning experience. The author, Rene, is also an Escapees member and writes articles for the magazine on a regular basis. If you don’t know about Escapees, go check them out here. If you are living the Nomad life you definitely need to be an Escapee member. They make life so much easier and give Nomadic families, like ours, a community of likeminded individuals we can count on. We’ve made friends, learned from other members experiences and have found places to stay with Escapees help over the last almost five years.

That’s all for this post, Guys! I can’t believe our Utah explorations are almost over. It’s gone by so fast!

See y’all down the road!

#NationalParkTour

The Hoodoos

The Hoodoos

Hey Guys!! Man, did Utah get cold!! We drove out of Moab and into what felt like Fall weather while we were in Torrey. We ended up having to use our propane furnace several nights. When we drove to our next stop in Panguitch…well…I’m pretty sure we drove right into Winter! Brrr it was cold the entire two weeks we were in Panguitch!

There are certain things you don’t think about when you live in a sticks-n-bricks home. Like…can we find someplace to fill the propane tank in our home…will we have ice crystals on the inside of our walls in the morning…and did we remember to turn off the water so the hose doesn’t freeze and crack overnight? These are real concerns when you live in a home-on-wheels and you’re experiencing below freezing weather. There are measures you have to take to insure you don’t have frozen poo in your tank or hose because…frozen poo is never a good thing. Ever. And it also has a tendency to cause some major issues when you’re trying to dump your tanks. Again…that’s not something you want to have to deal with. Ever.

Panguitch is a bit bigger than Torrey. There was an actual (albeit small) grocery store. But, hey…beggars can’t be choosers and we were just thrilled to have a grocery store close! Did you know, that Panguitch is a Paiute word that means “big fish”? Panguitch was originally settled in 1864 with the name of Fairview, but the name was changed in the late 1800s.

The main reason we were in the area was to continue our Utah Big Five National Park tour with Bryce Canyon National Park. I’d heard so many wonderful things about this park that I had pretty high expectations for our visit. The pictures I kept seeing on social media had me itching to get there and grab some shots of my own.

Our first trip into Bryce Canyon NP was later in the afternoon. We hit the visitor center so the boys could start the Junior Ranger books and then we headed out to do the eighteen mile scenic drive. I have to admit to y’all…our first impression of Bryce wasn’t good. In fact, after the first few viewpoints, we all kind of thought it was going to be another Grand Canyon for us. If you missed that post you can find it here. We weren’t really feeling it. The boys stopped getting out of the car to look at the view because “it all looks the same”. We were totally bummed. So far, Utah had not disappointed…was this park going to be a dud for us?

We didn’t get to go back to Bryce Canyon NP for several days…real life tends to happen even when you’re a Nomad. The next weekend we headed in to do the Navajo Loop/Queens Garden combined loop trail. We got there super early (about 8am) and headed straight to the trail. And Guys, oh…my…goodness…what a difference the right lighting makes. Look at those hoodoos! This was the fiery color I was wanting. I do know a bit about lighting…I do take my fair share of photos…but it really was interesting to see just how big of a difference the right lighting makes.

There are a few different ways you can do the Navajo Loop/Queens Garden trail. We opted to start at the Wall Street side of the Navajo Loop. It’s a pretty steep decent down into the canyon and we were kind of digging the feeling of heading down into the depths of it. When we started out that morning the temperature was close to 30° and there was a bitingly cold breeze. We bundled up and hoped that the cold would keep some hikers home.

We loved how once we got down into the canyon we found an entire forest. You can, of course, see the trees from the canyon rim, but you don’t realize how big they are or how many of them are hiding down there.

Did you know that Bryce Canyon isn’t really a canyon at all? It’s actually a series of amphitheaters that over many thousands of years of erosion have been carved out of the pink Claron limestone that makes up the Paunsaugunt Plateau.

The Paiutes believe that the rock pinnacles and hoodoos are actually people turned to stone by angry gods. They believe that their people were placed here to take care of the earth. Some of the rock formations do have people like shapes to them. In fact, the Queens Garden was given that name because someone thought that one of the formations looked like a statue of Queen Victoria. I don’t really see it… but, to each his own.

Our hike ended at Sunrise Point right as the park started getting busy. I have to admit…this hike totally changed our opinions of Bryce Canyon National Park. We’d resigned ourselves to not liking this National Park, but getting down into the canyon and walking amongst the hoodoos, spires, pinnacles, and monuments was amazing.

The canyon looks completely different when you’re down in it. It really is amazing how changing your perspective/view can change your whole outlook about a place. Bryce Canyon went from being near the bottom of our list to somewhere near the top.

We were close to Cedar Breaks National Monument so we took a day to go explore it. Unfortunately, when we got there…the facilities were closed. We were able to drive the six mile scenic road and stop at a few different viewpoints though. Also known as “Circle of Painted Cliffs”, Cedar Breaks has some beautiful views.

Cedar Breaks National Monument is like a mini Bryce Canyon. It is, in fact, an amphitheater just like Bryce Canyon. Cedar Breaks is around three miles wide and close to two-thousand feet deep and just like in Bryce, you’ll see a combination of fins, spires and columns jutting out of the canyon wall.

While we were exploring the Cedar Breaks National Monument area, we stumbled on Brian Head. At 11,312 feet, Brian Head Peak is the highest peak in southwest Utah and the 360° views from the top are breathtaking! On a clear day, you can see all the way to Arizona and Nevada. It was just a quick drive up a dirt road that didn’t need four-wheel drive and we had the entire place to ourselves.

We spent over four weeks exploring in and around Dixie National Forest. At nearly two million acres, Dixie NF has something to offer everyone from mountain forests and alpine lakes to canyon gorges. Dixie NF is Utah’s largest national forest. We’ve been to quite a few national forests during our travels, and Dixie is one of the most diverse we’ve seen.

We did find some time for foodies. Ha! Y’all know how we are about the foodies. So far, while in Utah…we hadn’t really been impressed with most of what we’d found. We did find a couple of hidden gems here and there. Panguitch had a couple more hidden gems for us. Local, little mom and pop places that were still open while quite a few places were closing for the season.

Well, Guys…I’m going to pause on our Panguitch explorations for now. I’ll share more with you in our next post!

See y’all down the road!

#NationalParkTour

Goblins and Canyons and Foodies

Goblins and Canyons and Foodies

Hey Guys! This is the last post for our time in the Torrey, UT area. We crammed so much into the two weeks we were in the area.

Goblin Valley State Park is the home of hoodoos and goblins. One of the coolest things about Goblin Valley is that there isn’t a set trail. You get to wander around three square miles filled with thousands of varying sizes and shapes of hoodoos that the park affectionately calls…goblins.

Before the park was known as Goblin Valley, it was called Mushroom Valley. We spent a couple of hours roaming around the goblin city and exploring the valley. It’s weird to think that millions of years ago this dry desert was once a tidal flat area next to a huge ancient inland sea.

While we were at Goblin Valley State Park we went to Little Wild Horse Canyon where we got our very first taste of a slot canyon. We got there late in the day so we couldn’t do the whole hike. We went in a mile or so then turned around. We did go far enough in that we did some rock scrambling and get a feel for what a slot canyon is. The sun was setting so the lighting wasn’t there for the glowing slot canyon pics you normally see.

Our first slot canyon was a success…it gave us the bug for more and now I’m trying to find family friendly (non-technical) slot canyons near our next stops.

Torrey, UT is a small town, but we did find some tasty foodies there. At one of the nearby diners, we found a pie sampler that consisted of oatmeal pie, pinto bean pie, pickle pie, and buttermilk pie. Each piece was just big enough that we could each have a bite. Well, I’m going to let you guess at the two flavors that none of us liked. At least we tried it. The last night we were in town we tried a burger place called Capitol Burger. Guys, this was the best place in town and it was just a little food truck!

With all of the rock formations around, we started seeing animals and patterns in the rock. Can you see them? We found a turtle, heart, baby dragon, and a turtle.

We had such a good time exploring this part of Utah! I didn’t realize just how much we’d seen until I started setting aside pictures for the posts for this area.

See y’all down the road!

#NationalParkTour

The All-American Scenic Byway

The All-American Scenic Byway

Hey Guys!! While we were staying in the Torrey, UT area we stayed right at the beginning of Highway 12…also known as The All-American Road Scenic Byway. With a name like that, we couldn’t help but explore at least some of it! The entire scenic byway is 124 miles with sooo many stops, hikes, and scenic backway roads that lead off to even more adventures.

All along highway 12 are scenic pulloffs to some absolutely stunning panoramic vistas.

You’ll also find three State Parks spaced out along highway 12. We stopped at one of them during our day of exploring. Anasazi State Park Museum sits at the site of an Ancestral Puebloan community that was used between 1050 to 1200 AD. Most of the site has been left unexcavated, but they have uncovered ninety-seven rooms along with several pit structures. There is a small replica (that you can explore) of what some of the structures would have looked like when the Ancestral Puebloan people were there. We spent a couple of hours checking this small State Park out.

One of the best…maybe the best… section of The All-American Road Scenic Byway is what they refer to as The Hogsback. This is the part of the highway that follows the thin razorback ridge of a mesa with steep drop offs on each side of the highway. Luckily, they put in a nice wide pulloff right at the top where you can get out of your vehicle and ogle the breathtaking views. I think I must have taken twenty pictures of just this pulloff alone.

When I did my research on places to stop and things to see on highway 12, one place kept coming up. Kiva Koffeehouse. Everyone said to stop for a snack and soak in the view…Guys, they weren’t lying. The view here was spectacular and the food was super fresh and tasty! We sat outside while we ate and the picture on the left was our lunch view. Then we drove around the corner and ran into the view in the right picture. And for probably the 100th time that day we all stood there saying wow!

Ancestral Puebloans used this area long before highway 12 was built. If you look closely, you can see the upper valley granaries still stored. A granary is where food was stored to keep it safe. They would wall up the area to keep animals and other people from getting to their storage. If you don’t know where to look, I’ve zoomed in and put an arrow pointing to the granary. It really blends in with the cliff side.

We made it all the way to Powell Point before we turned around. At Powell Point you can see the very topmost layer of the Colorado Plateau’s Grand Staircase. You can also see this same layer at Bryce Canyon NP.

On a different day we went back to highway 12 to tackle the scenic backway known as Hells Backbone. This is a thirty-eight mile dirt road built by the CCC to connect two mountain towns. So many of the reviews I read about this road kept saying how dangerous it is and under the wrong circumstances, I can see how it would be dangerous. You’d definitely want dry weather and no snow or ice on the road, but Hells Backbone is a great short scenic drive. Just watch out for the cows along the road (upper right picture).

We still had some light left, so we headed over to the Burr Trail Scenic Backway. Yup…another scenic trail! Ha! Burr Trail started out as a cattle trail to get cattle from their summer grazing pastures to their winter ones. We drove to the end of the paved part and found the view above. Not a bad view of the Circle Cliffs with the Henry Mountains in the background.

On the way back out of the Burr Trail, we stopped at a pulloff that led to a deep cleft in the side of the canyon wall. When we walked up to the cleft, there was a family there with two girls who were singing songs from The Sound of Music and Guys…the acoustics in this cleft were amazing! The girls sounded wonderful. While we were chatting with the family, a small owl flew out of a nearby tree, floated right over our heads, and landed in a little alcove in the canyon wall. It took us all by surprise! It was a really cool experience.

Hells Backbone Road and Anasazi State Park Museum are actually part of a bigger National Monument. Grand Staircase-Escalante National Monument is divided into three different units and spans across close to one million acres. Besides the fact that this is one huge National Monument, the area within it is the last place in the US to have been mapped. We explored some of this park from Torrey and some from our next stop, Panguitch…so stay tuned for more on this amazing National Monument!

I have one more post for our time in Torrey! We’re going to need a vacation once we finish with Utah so we can get some rest… There’s so much to see and do here.

See y’all down the road!

#NationalParkTour

Capitol Reef National Park

Capitol Reef National Park

Hey Guys!! We are now on our second stop in Utah as we make our way across southern Utah to visit the Big Five along with as many National Monuments and State Parks as we can fit in. We thought that there would be less to do in the Torrey, UT area…but, well…we were wrong. We were just as busy!! Guys, we might need a vacation from our National Park Tour.

When we first got to Capitol Reef NP, I wasn’t sure how I felt about it. The thing that stuck out the most to me was the main highway that went right through a portion of the park. Now, we’ve been in other parks with highways and paved roads…most have them…but for some reason, this particular setup just didn’t do it for me.

Until I spent some time in the park.

The huge domes, towering cliffs, arches, bridges, and amazing stone rock formations transport you to another world. And Guys, the way the light plays on the rocks and makes them change colors throughout the day… I totally fell in love with this park.

Never, in my wildest dreams, did I imagine I would see a caution radiation sign in a National Park. And…the radiation area is a protected bat habitat?? Um…what?

The yellow tint in the sandstone rock is actually trace amounts of uranium. In the early 1900s uranium was a hot commodity due to the idea that it had health benefits. People would wear rocks laced with uranium around their necks or crush it up and drink it in water. Then in the 1950s the government was on a search for uranium to help protect the country. Ultimately, the amount of uranium found in the Captiol Reef NP area was so scant that the area was abandoned for uranium production. The mines are still there though and apparently, bats like to roost in them…so if you see little glowy lights flying around at night…it’s probably just the bats.

The first thing we did was the eight mile Scenic Drive that takes you back into a small portion of the park. It’s a great introduction to the park and what this park is protecting. The Scenic Drive is a small portion of an original route once used by the Ancient people we now refer to as the Fremont. When settlers came to the area in the 1880s the route was turned into a wagon road.

The backbone of Capitol Reef National Park is a 100 mile long waterpocket fold. A what? A waterpocket fold is basically a huge wrinkle in the earth’s crust formed by a monocline. Early settlers described it as an “impassable reef” of rock. Until 1962, when Highway 24 was completed, the only way through this section of the Waterpocket Fold was the original road that was prone to flash floods. We actually witnessed a flash flood while were on part of the original road. We found high-ish ground with our 4Runner and waited it out. Some people had to abandon their vehicles in the flow of water and just hope it didn’t rise too much more. The flash flood came on quick and left just as quickly leaving a muddy wet mess behind. no one was hurt and all humans/vehicles were able to get out mostly unscathed.

They call it The Pioneer Register, but really it’s just old graffiti. And, you’re not supposed to add to it. Ha! The Pioneer Register is located along a stretch of the original road through the Waterpocket Fold. For some reason, early travelers started leaving their mark on the steep sandstone walls. We saw everything from fancy script to names being shot into the wall with a gun.

On the same hike as the Pioneer Register, you’ll find The Tanks. You can climb up the cliff and see some depressions in the rock that collect water when it rains. When we went, the “tanks” were pretty dry, but the view from the top of the cliff was pretty cool! And the boys (all four) had a great time being mountain goats as they criss-crossed around the cliff trails.

There are also several places where you can find even older graffiti left by the Fremont people who were some of the very first people to settle in the area (from 600-1300 CE). They didn’t have a form of writing other than the petroglyphs found along the canyon walls so we don’t know much about them. We know they did a bit of farming and that they used the atlatl to hunt with. We think they had camps along the Fremont River.

One of the hikes we did while in Capitol Reef NP was the Chimney Rock Loop. The trailhead is right off that highway I told you runs through the park and every time we passed it, the parking lot was full so we knew it must be a good one. This trail has an elevation gain of 590 ft, all at the beginning of the hike during the first half mile or so. After that, it was cake. And the views…

The Hickman Bridge trial was another one that had some amazing views. This was a relatively short trail to a 133 foot natural bridge. Hickman Bridge is one of the pictures you’ll find on a lot of the Capitol Reef NP souvenirs like stickers, postcards, and pins. We did each of these hikes late in the afternoon and the crowds were minimal.

We never saw any glowing bats… but we did see tons of these little squirrels and lizards while we were there. The squirrels were pretty used to seeing people and I think they’ve been fed a few times. Please keep wildlife wild. Even the squirrels. You really are doing them a disservice by making them dependent on humans and handouts. And honestly, human food isn’t good for them.

There are a couple of longer scenic drives you can do that wind their way in and out of the Capitol Reef National Park boundaries. We did the entire Cathedral Loop drive and Guys, it was totally awesome! We spent an entire Saturday doing this drive. We stopped by the visitor center and picked up the Cathedral Loop driving guide. It totally made the drive. Seriously. It had info on all the stops and the little side roads that we would have driven right by had we not known what was down them. That little guide was totally worth the $3 we paid for it and more.

The Cathedral Loop starts out at the visitor center then takes you down the main highway. There are a few stops along the highway that talk about the early Mormon settlers that came to the area back in the late 1800s. It’s not long before the scenic loop has you turning off of the nicely paved highway onto a dirt road where you have to ford the Fremont river! This was our first river fording and it was both exciting and terrifying all at once.

Once upon a time… this land was used for ranching and the ranchers brought out a drilling truck to find water for all of their cattle. I’m not sure why the ranchers left the drilling truck, but it looks neat. The well is still active so there’s an artificial oasis way out in the middle of the desert. We got out and looked around on the way through. The truck really does look cool the way it’s partially buried.

These bentonite hills are sooo my color. Bentonite is actually a clay that is full of volcanic ash. When it gets wet, it’s super slick and sticky. How can it be slick and sticky at the same time? Magic. That’s the only explanation I have. See that left picture? It kind of looks like popcorn, right? Bentonite clay gets a popcorn like surface from repeated cycles of absorbing rain then drying again. We thought these bentonite hills were super neat!

One of our favorite things about the Cathedral Loop is that it has small hikes spaced throughout. It was nice to get out of the car and stretch our legs…and to stop bumping down the dirt road every so often.

We learned sooo much on this drive. The booklet we picked up at the visitor center is jam packed with geology facts, history, and even a bit of ecology. I’m not going to go through each stop and lesson we learned. Y’all can go do the loop yourself for that! Ha! But, I will share some of our favorite pictures and some little tidbits too. Like…in the top picture in the gallery above…the valley extends twenty miles! This view was unreal. We felt like we were looking at a movie set. The picture doesn’t do it justice at all.

Welcome to Cathedral Valley. In 1945, the first superintendent of Capitol Reef, Charles Kelly, and Frank Beckwith, a newspaper owner, gave this valley the name of Cathedral Valley because the rock formations reminded them of Gothic architecture.

Alex is taking an earth science class this year. He was pretty stoked to get the chance to see volcanic sills and dikes in person! What am I talking about? Well, a long long time ago…around three to six million years ago…molten magma pushed its way up through cracks in the earth’s surface. The magma cooled and solidified and turned into vertical walls (dikes) and horizontal layers (sills). You can see some awesome vertical walls (dikes) in the two pics above.

On the right you’ll see a two hundred foot gypsum sinkhole. It was impressive! Now, on the top, you will see the boys standing in front of Glass Mountain…which isn’t made of glass at all. It’s actually made of selenite crystals also known as moonstone which is a crystalline form of gypsum. They think that the sinkhole used to look like Glass Mountain. It’s weird to think that one day, Glass Mountain could be gone and replaced with a huge sinkhole.

Guys, you really need to get out there and see these places. At this stop along the loop, we got to see the Temples of the Sun and Moon up close. Made of soft Entrada Sandstone…these giant monoliths are literally melting every time it rains. In the picture on the right…you can see the texture of these monoliths. It looks like flowing mud…because when it’s wet, it basically is. Many of the cool rock formations within this amazing National Park are melting away…they’re eroding at relatively rapid rates.

“Wilderness is not a luxury but a necessity of the human spirit, and as vital to our lives as water and good bread…” ~Edward Abbey

Go out and explore the wilderness while it’s still around to explore.

See y’all down the road!

#NationalParkTour

Dirt Roads and Hiking

Dirt Roads and Hiking

Hey Guys! This is the last of three posts about our two weeks in the Moab, UT area. We really did cram quite a lot into those two weeks!! I feel like we went non-stop and we still didn’t even scratch the surface of what’s in the Moab area. I think it’s safe to say that we will definitely be revisiting Moab in the future.

One of our favorite things about this Nomad life of ours is the people we get to meet. Our neighbors in Moab were super nice! They were in the middle of an epic road trip from Massachusetts all the way to Arizona and back. When they left, they gave us a few guide books for the Moab area and they left notes as to what they did! Like I said..super nice! We ended up doing the Gemini Bridges trail/hike because they’d recommended it and Guys, it was awesome! To get to the Gemini Bridges we drove up a dirt 4×4 road. Yup, we found another dirt road to drive on. The road up to the plateau that the bridges are found on was steep and narrow with a pretty big drop on one side, but once we got up onto the plateau, the road was better. There are a few places to park and a marked trail out to the bridges. Gemini Bridges are two natural bridges that lay side by side. There’s about a six foot gap between them and apparently some people try to jump the gap…and a few have missed. The sheer height of the cliffs near the bridges could set someone’s vertigo off. It was so steep! When we got there a group was leaving. We had the place to ourselves for about ten minutes.

When we left Gemini Bridges we went a different way and ended up on a paved highway just outside of Canyonlands National Park. On the way home we found a scenic pull off with a short hike. Not a bad view. We were amazed at how far we could see. The day we went was crazy windy! We were very careful not to get too close to any of the edges because we were concerned we’d get blown off by a gust of wind. It was that windy.

A couple of years ago, I found a picture of Fisher Towers somewhere on social media and I immediately wanted to go see them in person. I tagged them on my Google Map and waited patiently for the time we would be in the Moab area.

I loved this hike! It was just the right combination of effort and views to make it interesting and enjoyable. I can’t really imagine doing this hike in the summer though. There wasn’t much shade to be found on the trail and there was a fair amount of effort in going up and down to navigate this trail. The whole area is made of pinnacles, spires, and fins that you wind your way around.

After we finished playing over at the Fisher Towers, we headed down the road to Onion Creek for a dirt road adventure. Onion Creek got it’s name from the slightly stinky smell of the creek. You splash through this creek several times as you make your way through some really cool rock formations. We were surprised by all the different rock colors! The top right picture in the above gallery reminded us so much of Artist Pallet in Death Valley. We didn’t drive the entire road, but what we saw was really cool!

Corona Arch trail is one of our favorites in the Moab area! This trail is only three miles long , but it leads to one of the biggest arches in the Moab area. We went on a late afternoon, mid-week and we pretty much had the place to ourselves. We passed a few people on the trail and there was one other person at the arch with us, but there wasn’t a crowd of people like you’ll find over in Arches National Park.

The trail to Corona Arch has you climbing up a ladder and using some steps that have been cut into the side of the rock (called Moki steps) along with some cables. It wasn’t too technical, but just hard enough to be fun. It’s a great hike for someone who’s trying to get outside of their comfort zone just a little and get off the flat path.

Your effort is rewarded with not one but two arches. Bowtie Arch is…I think…a pothole arch and it’s smaller, but still very cool. The star of the hike is Corona Arch. We actually all voted Corona Arch our favorite arch in the area. And yes, that’s including all of the arches we saw at Arches National Park! Corona Arch has an opening of 140 feet across by 105 feet tall and is made of Navajo sandstone like most of the arches in the area. Rumor has it…that airplanes used to fly through the opening of Corona Arch. Since it’s not in a National Park…it’s not quite as protected. I think it’s now a BLM NP Unite and protected land though so hopefully, it’ll receive some more protection.

That’s it, Guys! That is pretty much everything we did in the Moab area. We checked off everything we had on our list, but ended up adding several new things to see next time!

See y’all down the road!

#NationalParkTour

A Day of Monuments

A Day of Monuments

Hey Guys! Since we’re on a National Park Tour we decided to cram three National Monuments into one very long day. Three. I’m not sure that was one of our better ideas…but we did it and we all survived…barely. Ha!

Our first stop was in the Shash Jaa Unit of Bears Ears National Monument. Bears Ears is made up of two different units and is bursting with ancestral dwellings, rock art, and amazing rock formations. The whole National Monument is contained within about 228,000 acres. The Shash Jaa Unit has some incredible cliff dwellings tucked into the sides of cliffs and in caves.

Bears Ears NM is so big…and we were trying to squish three different National Monuments into one day…so we had to pick and choose what we made time for during this visit. My main interest was a place I’d found out about several years ago…House on Fire. The trick is to get there during the right time of day so that the sun bounces off the canyon floor and hits the cliff dwelling giving it a fiery glow. We got there too early and joined the small group who were also there to see the phenomenon of House on Fire. While we waited I took pictures from several angles at several different times. I took some with my good camera…I took some with my phone camera…I took some up-close…far away… You get the point. I was covering all of my bases trying to capture the amazing effect I’d seen on the interwebs. I got it! I had several different pictures that I deemed worthy. And, honestly, my phone camera picked up the effect just as good as my expensive camera.

Bears Ears National Monument is a newer National Park. There’s not an official visitor center yet. It seemed to us that the area BLM Rangers and National Park Service Rangers were all kind of sharing the stewardship of this particular park. We hope to one day go back and explore more of this amazing park. BTW…Bears Ears NM is named for the two towering buttes that stand out against the surrounding landscape. You can see them in the picture on the right.

Natural Bridges National Monument was our second stop of the day. This might be a good time to tell you the difference between an arch and a natural bridge. An arch has to have an opening of three feet and is the remnants of geological stone formations such as fins, ridges, or rock cliffs. A natural bridge is formed when running water cuts through a canyon wall. Natural bridges are actually more rare than arches. Another noteworthy difference is that bridges tend to be lower in canyons while arches are usually higher up and easier to spot. Both are formed from different types of erosional forces.

Natural Bridges National Monument is the home to three of the world’s largest natural bridges and all of them are within the same canyon. Sipapu Bridge is actually taller than the National Capitol Building. There are short but steep hikes down to each of the three bridges. You can see them from some well placed viewpoints as well. We’d already done some hiking this day and the boys were starting to make noise about lunch, so we opted to gaze at the natural bridges from afar instead of hiking down to each of them.

Our last stop of the day was Hovenweep National Monument. This National Monument tells the story (or at least what we know of the story) of a group now known as the Ancestral Puebloan people. There have been people living in and around Little Ruin Canyon for thousands of years. They started out as hunter/gatherers and somewhere around AD 900, settlements began appearing along the cliff walls and around the top of the canyon. In the 1200s, the Ancestral Puebloans started adding pit houses, kivas, and pueblos to the community that was now around 2,500 members strong.

Most of the ruins you can see standing today were built in the mid to late 1200s. This little community was just one in a whole system of settlements. Each community was a days walk to the next community. There’s a bit of a puzzle as to why so many stone towers were built in this particular location and why they were placed in sometimes precarious positions along the canyon rim or within the canyon. No one knows why the Ancestral Puebloan people seemed to suddenly disappear or why they left or even where they went.

We’ve always enjoyed learning about our country’s history. Some of our favorite National Park Units tell the story of the first people to call our country home. We had several great conversations as we walked through these ancient dwellings. Where did they go…why did they leave…why did they build the towers? Sometimes we leave a National Park with more questions than when we got there and that’s ok. One of the reasons we go to National Parks is to learn and sometimes you have to learn what questions to ask before you can find the answer.

Well, Guys…I think I’m going to hit the pause button again on the Moab area adventures. I’ve got more to share with you so stay tuned!

See y’all down the road!

#NationalParkTour

Arches and Canyons

Arches and Canyons

Hey Guys!! We made it to Utah!! We loved Colorado quite a bit and we’re totally going to miss it, but we were ready to adventure into a different state…at least for a little while.

Y’all know we’re on a National Park Tour so it shouldn’t be a surprise that our first stop in Moab was Arches National Park. We stayed pretty close to Arches, so we were in and out of the park on a fairly consistent basis during our two weeks in the area. We would head there in the late afternoons to get some hiking in and it worked out pretty well because most other explorers were headed out about that same time which meant…fewer people in the park.

Arches National Park is home to over two thousand natural arches made out of sandstone. There are several arches you can see right from the paved road that winds its way through the park. But, if you want to really experience an arch…you’ll need to get out of your car and get some sand under your feet. To photograph an arch, you’ll want a little distance so you can get the whole arch in the shot, but to get a good feel for how big some of these arches are, you’ll need to get up close to one. This can be easier said than done on most days in the park. Arches NP is super crowded with tons of other people trying to get “the view” of that same arch you’re trying so hard to get “that shot” of. It can be frustrating. We try to avoid going into a busy NP during the weekend or over a holiday. We had better luck with crowds by going during odd times…usually later in the afternoon/evening throughout the week when most people were leaving.

Arches are the main attraction at this National Park, but they aren’t the only attraction. There are also towering sandstone spires, pinnacles, fins, and balanced rocks. Some formations look like elephants! To get to Sandstone Arch, you have to hike between two sandstone fins! It was a really short and neat hike.

It takes a lot to make an arch. You have to have the right kind of rock and it has to be exposed to just the right combination of environmental factors…and time…lots and lots of time. In order to be considered an “official arch”… there has to be at least three feet of space within the opening of the arch. Becoming an arch is no easy task.

If you’ve ever seen a postcard or a sticker or sign for Arches National Park, chances are…you’ve seen Delicate Arch. Delicate Arch is the poster arch for all arches at Arches National Park. It’s the arch that all of the other arches want to be. It’s a stand-alone, complete arch with an awesome view. There are two ways to see Delicate Arch. You can go to one of two viewpoints or you can go to the trail-head and hike the mile and half up, up and up to get to the actual arch. We did both. We stopped by the viewpoints first, but when we saw how far away we still were…we went back on a different day to hike up to Delicate Arch. I’m so glad we hiked it…the view from the top is spectacular and while there was quite a lot of up to this hike, it wasn’t too horrible.

Our favorite hikes at Arches National Park was the Devils Garden. There are several different trails and arches you can get to within the Devils Garden. We did the four mile Double O Arch Trail and it was awesome! When you first start this trail the crowd can be a bit thick, but once you get to the good stuff…the part where you climb up the back of one of the fins…the crowd starts to thin. And then when you walk across the back of a different fin…Guys…the views. I caught the boys with their mouths hanging open and their cameras out trying to capture the amazingness of this hike. I know, I know, some of you don’t think amazingness is a real word…and if it’s not…well, it should be. It. Should. Be.

We timed our Double O Arch hike just right. We got there ogled all of the views, shimmied down the back of the fin and made it to the trail-head right as the light show started during that evening’s sunset. We stopped the car several times so we could all sit and watch the sunset. Mother Nature was not playing around that night…no…she was showing us some of her best stuff. She always wins. Always.

We only spent a day at Canyonlands National Park. We were a little farther away from it and there was so much to see and do in the area that we didn’t want to take the time to drive all the way back. We only had time to visit one of the three sections of Canyonlands NP. We spent time in the Island in the Sky section. We’ve already discussed the need to go back and see more of this park. It is, after all, the biggest national park in Utah and that is saying something.

We did the scenic drive, stopped at all the stops, and got in a couple of short hikes, but we were really wanting to drive down into the canyon and then find our way over to Potash road where we could drive back to Moab…on a dirt road…following the Colorado River for most of it. Y’all know how we are about dirt roads. Ha! Canyonlands National Park has a canyon within a canyon within a canyon. I’m not even joking. There are three layers of canyons at work in the picture above!

We seem to always find ourselves on a dirt road. What is it about dirt roads that we love so much? Well, they usually take us to some pretty dang awesome places and…not many people are equipped to drive them so the crowds tend to thin out a bit. We drove down out of Canyonlands on Shafer Trail then made our way over to Potash Road and back to Moab. Potash Road is one of our absolute favorite dirt roads in the Moab area. The views along this drive are breathtaking as it follows the Colorado River for several miles.

Well, Guys…I think I’m going to pause here for now and pick up with some more of our Moab adventures next time!! We crammed so much into these two weeks…So, stay tuned!!

See y’all down the road!

#NationalParkTour

Monuments, Dinosaurs, and Mesas…

Monuments, Dinosaurs, and Mesas…

Hey Guys!! We spent two weeks in the Grand Junction area of Colorado and we enjoyed it way more than we thought we would. Sometimes we’re not sure what the area we’re heading to is like. We try to make sure there’s an actual grocery store somewhere close, but you never really know until you’re pulling into the park. We’ve had some places look great on paper and then when we pull in…the entire area was a big nope for us. I’ll be honest, I kind of expected it to be that way for Grand Junction. So, when we got to Grand Junction and saw it, we were pleasantly surprised. It’s that perfect mix of small town vibe with all of the stores we like and with more than 1.5 million acres of public lands in the area…we had more than enough places to explore to keep us occupied.

A whopping seventy-five percent of Mesa County is made up of public lands. Guys, that’s insane! To give you a size comparison…Mesa County is larger than the states of Delaware and Rhode Island combined. You’ll find areas for National Park Service, Bureau of Land Management, National Forests, State Parks and even a few City Parks. I’m thinking we could easily spend an entire season exploring everything that the Grand Junction area has to offer.

The main reason we were staying in Grand Junction was to visit Colorado National Monument. We headed in to explore the plateau and canyon that make up the Colorado Monument on a few different afternoons. You can pretty much see all of the highlights if you do the 23 mile Rim Rock Drive, stopping at all of the well thought out scenic view points. Some will have short hikes to get to the view…most will not. We thought the Rim Drive was fantastic, but we like to get into the park and hike. We feel like you get a better feel for the landscape and the story the park is trying to tell/preserve.

Ten minutes down the road was the little Dinosaur Journey Museum. It was inexpensive to get in (even with five people) and it was stuffed with information on the dinosaurs that used to roam the Mesa County area. I’ve had songs from the animated show Land Before Time stuck in my head ever since. The animatronic dinosaurs seemed to all be characters from the show. Ha! We learned a lot in the museum even with me trying to get the boys to sing along to the songs of their early childhood.

The day after we visited the Dinosaur Journey Museum, we drove part of the Dinosaur Diamond Scenic Byway up to the Dinosaur National Monument. There are actually two parts to this National Monument. There’s the Colorado side, which has all of the grand vistas and geology information. This is the side we started on. We did a couple of hikes here, but since we were trying to get the entire park into just one day…we were kind of hoofing it. The views were absolutely amazing on this side of the National Park. We could have easily spent the entire day hiking and ogling the views here.

The Utah side of Dinosaur National Monument is all bout the dinosaurs and the petroglyphs. The first thing you’ll want to do is take the tram to the Quarry Exhibit Hall where you’ll come face to face with a huge wall of dinosaur bones. And Guys, these are the real deal…these aren’t the casts that you’ll so often see in museums. It’s hard to capture how big this bone wall is…it holds over 1,500 fossils that have been embedded within the rock. The scientist working the quarry that this rock wall is part of found over 500 different kinds of dinosaur remains along with some other animals who were alive during the Morrison time period. For the most part, you’re not allowed to touch the wall or the bones, but there are a few bones that the National Monument has set up so you can actually touch 149 million year old dinosaur bones. When we were done soaking up all of the dinosaur awesomeness…we headed back out to the park to find some petroglyphs and check out a cabin leftover from an early settler to the area. We saw quite a few lizards during our visit and if the petroglyphs are any indication…the lizards have been around for quite a while. There was a section of petroglyphs that had tons of giant lizards. I’m glad the lizards we saw were the little bitty variety and not the six foot beasts on the canyon walls.

The cabin used to belong to Josie Bassett Morris back in the early 1900s. She moved to Cub Creek when she was forty to establish a homestead. Most of the time she was there alone, but her family and friends from a nearby town visited as often as they could to check up on her. One day when she was out checking the cattle she fell off of her horse and ended up breaking her hip. Josie drug herself the entire way back to her cabin to heal. She lived at her homestead in Cub Creek for fifty years before passing away in the cabin. The cabin is still there. Open for anyone to walk through. You can see the remnants of the wall paper she had up…the nails are still there where she hung pictures of her family. The fire place has a couple of logs in it. If you close your eyes you can imagine the braided rugs on the floor and the handmade quilts on the bed. I enjoyed looking though the rooms and thinking about Josie’s life there. She was definitely a strong and independent woman.

We took an entire day to do the Grand Mesa National Scenic Byway where we explored the world’s largest flat-top mountain. So, what the heck is a Mesa? I know you’re wondering. A mesa is a wide mountain with steep sides and a flat top. Mesa is the Spanish word for table. Grand Mesa’s flattop is due to the cap of volcanic basalt it acquired around nine million years ago when lava pushed up through cracks in the earth covering a valley floor with basalt lava. Eventually, the soft rock around the hardened basalt lava eroded away and Grand Mesa was born. Around 14,000 years ago ice caps went through the area rearranging the tabletop and forming more than three hundred lakes and reservoirs.

Can we take a minute to appreciate all of the pretties I found in the Grand Junction area?! I mean…Guys…I think I took just as many pictures of flowers as I did all of the other awesomeness in the area!! And…I found one of my absolute favorites…fireweed!

We had two pretty good weeks in Grand Junction! We didn’t even scratch the surface of what there is to do. I think we’ll for sure have to go back and spend more time in Mesa County, Colorado.

This was our last stop in Colorado before heading on to Utah.

See Y’all down the road!!

#NationalParkTour